David Haye took aim at Eddie Hearn, Tony Bellew and Anthony Joshua in a classic press conference before his bout with Bellew back in 2017.
In the build-up to the PPV fight, Haye took his moment to speak at the presser as an opportunity to launch a verbal attack on Hearn.
Haye took aim at Hearn when it was his time to speak
Haye began: “In the time that I’ve been out, I’ve been watching social media, watching YouTube to see what’s happening on the scene.
“And all I’ve noticed is Eddie Hearn – everything’s the Eddie Hearn show.
“And this fight gives me the opportunity to shut his big mouth.
“He shouldn’t be hosting this, Adam Smith [of Sky Sports] should be hosting this, but he wanted to get out there.
“The reason why Tony believes I’ve got a load of diva-ish demands – we’ve got a list of things I want, ring, gloves, changing room.
“When it came to negotiations, the only thing Eddie really put his foot down on was that it was called, ‘Eddie Hearn and Hayemaker Promotions presents’ [with his name first].”
At this point Hearn interjected: “It was actually the split.”
But Haye replied: “No it wasn’t the split.”
Hearn said: “Listen, I’m pleased to be giving you the payday.”
To which Haye hit back: “No, no, no, no – the only thing you put your foot down on was putting your name first.
Haye and Bellew clashed when they came face-to-face
“Now, once again, you’re sticking your face out, it’s all about the Eddie Hearn show.
“I tried to watch a Katie Taylor interview the other day, really interested to see how she was, her first fight, really looking forward to it.
“She starts talking and you barge her out the way, ‘Ah, here we go, apples and pears,’ jumping around, clowning around.
“It’s not the Eddie Hearn show, you should be promoting your fighters. A boxing promoter promotes their fighters, doesn’t promote themselves.
“I’m more of a promoter in this than you are.”
Hearn interjected again: “No, you’re a joke promoter, I’ve seen your shows, they’re not fights.”
Haye and Bellew had to be separated by security after a punch was thrown
But Haye shouted him down: “Who’s talking now? Who’s talking now?
“I’m talking to the press and you’re making it the Eddie Hearn show.”
Hearn replied: “You’re the only person that likes the sound of their own voice more than me.”
After a minute’s further bickering, Haye told Hearn: “I’d probably be working with Matchroom if your old man [Barry Hearn] was running the show.”
But Hearn hit back: “But you know what? You are working with Matchroom because you’ve got no choice because you need the dough.”
Haye said: “After I’ve taken out this guy, I’m gonna come back and take out Anthony Joshua and end your business.
“Matchroom’s gonna be over, trust me.”
After the press conference concluded, the fighters then squared up for a face-to-face.
Haye pushed his head into Bellew, prompting Bellew to shove him backwards.
As he did so, Haye threw a left hook and caught Bellew in the face.
In the fight though, Bellew pulled off a massive upset as he KOd Haye who suffered an Achilles injury midway through.
In their rematch a year later, it was a repeat result which brought about Haye’s retirement.
ale GroomingBeard CareHow to grow and trim a long beard
How to grow and trim a long beard
After a decade of unwavering popularity, beards are still very much on trend. As more men sport facial hair than ever before, the substantial full beard has become a status symbol and the ultimate fashion accessory. Big, burly beards are a sought after look, but when it comes to facial hair, no one style suits all. A carefully curated beard can help highlight your best features and ensure you look your best. Here, we’ll help you work out the optimal beard styles for your face shape, as well as how to grow a long beard, trim and maintain it at its best.
How to grow a full beard
Step 1: Stop shaving & trimming for a while
Growing any big beard style takes time and patience. Mother Nature won’t get to work overnight, so perseverance is key to achieving the big beard of your dreams. Wondering how long a beard takes to grow? Genetics, testosterone levels and lifestyle choices all have a part to play. The average growth rate for hair is around half an inch per month, so a full beard could take anything from three months to a year, depending on what kind of style you want. Eating a balanced diet, exercising, getting enough sleep and good beard carecan help your beard grow faster, thicker and longer. However, the best tip for how to grow a long beard might just be patience. Don’t give up too soon.
Step 2: Condition your long beard regularly with beard oil to keep it soft & thick
Most people use products such as moisturisers to replenish their skin, and facial hair requires similar care and attention. Beard hair is subject to damage from environmental factors just like your skin. You can make growing a full beard easier by making beard oil your new best friend. Although oiling your beard regularly won’t accelerate the rate at which it grows, conditioning your long beard can help prevent breakage, making it appear thicker and healthier than without. Massage in beard oil every day to keep your facial hair soft, conditioned and naturally shiny.
Step 3: Use a beard brush to groom it daily
Daily grooming is essential to growing and maintaining a long beard that’s striking for all the right reasons – especially if you’re trying to grow a bold and big beard style. A quality beard comb or beard brush can work wonders to help you look at your best during the tricky growing phase. Even when shaving and trimming your beard is off the cards, you’ll still want to make sure it looks well groomed. Invest in a quality boar bristle beard brush and keep it with you to prevent your full beard from knotting or becoming matted during the day.
Step 4: While growing a full beard make sure to shave & trim edges for an even result
When growing a full beard, remember that it’s a journey. You may have to suffer your facial hair looking a little patchy or wild for a while until you get your desired look. Once you have enough hair to cover your face, it will start to grow out in volume. Using a beard trimmer while your facial hair grows may sound counterproductive, but proper maintenance will keep your long beard orderly and give it an enviable shape. Try using the Braun Series X trimmer to tidy up the beard edges and ensure clean, even lines across your face.
Step 5: Use a beard shampoo daily to ensure you keep it clean & fresh
If you’re growing a long beard or a full beard, good hygiene and cleanliness is really important. Most people shampoo and condition the hair on their head daily, so washing your beard at least three times a week should become an essential part of your grooming routine. Using a tailored beard shampoo is advisable, as some formulas can strip your beard of its natural oils and cause the hair to become dry, wiry and brittle. This can result in dreaded split ends or bald patches. Exfoliating regularly and using beard shampoo will help lock moisture into the hair follicles, which will then stop your beard from becoming dry or itchy.
How to trim a long beard
Step 1: Use a beard comb to brush in the direction of the hair
A good beard comb usually has two functions: wide teeth to glide through the thicker parts of your beard, and smaller teeth to tame your moustache. Brush your long beard in the direction you want it to grow, which will help tame any stray hairs. Start from your neckline and work towards your jawline and chin, then move onto your cheeks, separating all the hairs so they lay flat on top of each other. Once you’ve brushed your beard into the style you want, finally fan your moustache out and away from your mouth.
Step 2: Shave and trim around the beard to create the desirable shape
Figuring out how to trim a long beard in a way that suits you is essential to ensuring it keeps looking good. First, take beard scissors and snip away any longer straggly hairs. This is particularly important for full beard styles, which can easily get out of hand. Even if you have a long beard, you’ll want to keep the hair between your neckline and Adam’s apple neat and short with an electric shaver. To locate the midpoint of your full beard, place two fingers above your Adam’s apple and tilt your head back. Clip everything below this imaginary line, following the curve up to your ears. The best beard trimmers for long beards have multiple attachments to help you prune your neckline and cheeks into the shape you want.
Step 3: Find the most suitable long beard trimmer for you
If you’re growing or maintaining a full beard, having the right tools to hand is essential. No tool is more important than your long beard trimmer. Finding the best device for you can feel like a daunting task at first, but the key is to select one that’s especially designed for long beards. These kits have multiple trimmers, blades and comb attachments that make styling your facial hair easy.
Step 4: Trim your sideburns & cheeks
Defining your sideburns and cheek line is really important to achieving a striking full beard look. These finishing touches can take you from scruffy to sophisticated in a matter of minutes. A softer, natural look requires less upkeep and can make your beard and face look bigger. A neater, more defined cheek line can help you create the illusion of strong facial angles and edges. Start by creating a line from your sideburn to the corner of your mouth. If your face is round, contour a straight cheek line to provide definition. If your face is long or angular, a curved beard cheek line can soften the contours of your face, giving you a friendlier appearance.
Step 5: Trim your moustache
Whether you want a soft or defined long beard, your moustache will require some precise upkeep. Simply comb your moustache hair over your lip and trim with scissors or a beard trimmer. You may find that you need to clip and maintain your moustache more frequently than the rest of your facial hair. If you’d like to make a statement, try trimming the moustache so that it’s a bit shorter than the beard. You can even curl it up with some beard wax for dramatic effect. The result will be the perfect companion to your long beard style.
Step 6: Shape your long beard according to preference
Not all beards are created equal, and it is important to work out the shape that suits you best. You can trim the lines of your beard to balance out your facial features, or throw the rulebook out the window and go for a style that makes a real statement. In terms of general advice on how to shape a long beard, you’ll find that thicker, fuller facial hair can help fill out a thin face. The reverse is also true – a long beard that’s clearly defined at the jawline can help slim a fuller face. Muttonchops can balance out a long face. Faded sideburns and a sharp outline create a smart impression, while a natural ‘woodsman’ style is great for making a bold impact.
Step 7: Use scissors to ensure you get every last stray
Quality scissors are a key part of every beard-owners kit. It may seem old fashioned compared to a top-of-the-range long beard trimmer, but scissors are a useful additional tool for those looking to maintain a natural look, and for those looking to prune every last stray hair into place. Whether your beard is close-trimmed or bushy, don’t overdo it with the scissors. Make quick, light cuts at the tips to ensure it stays big and beautiful.
Step 8: Moisturise with beard oil and beard cream
While trimming your long beard regularly is important, adequate aftercare is also vital to keep your facial hair looking its best. Make sure you keep your newly pruned beard healthy by replenishing moisture after each trim. Work in a few drops of beard oil and massage into the entire area to help stimulate hair growth. For a heroic-looking beard, invest in some beard cream, wax or balm to keep your style polished and tidy all day long.
Step 9: Make sure you repeat trim every 3-5 days to maintain desirable length
How often you trim your beard comes down to personal preference, but to maintain good shape and thickness, try to trim it every five days. If you have a full beard style with more detail, you may find trimming every other day works best. Whenever you trim your beard, make sure you are not in a rush or mistakes may happen. Most people find it easier to shape their facial hair in the evening after a shower or bath, when they’re more relaxed.
Most popular long beard styles
Style 1: The hipster beard
The bold and thick hipster beard is a perennial favourite style of the modern-day ‘beard boom’. This distinctive designer full beard style is characterised by a carefully trimmed handlebar moustache, and is usually combined with a sharp, conservative haircut for a statement-making look. The contemporaryhipster beard look can be compared to a well-groomed lumberjack or woodsman.
Style 2: The Viking beard
A wild and busy Viking beard is a big, bold choice that portrays strength of character. This tough look is not for the faint of heart. It takes a great deal of patience and precision to grow this type of beard to the upper chest, but the results are well worth it. For a classic Viking beard style, let the hair grow wild and free, then trim into a squarish block that’s even all the way through. While light trimming is essential, ensure your Viking beard is connected all the way up to the sideburns to keep it authentic.
Style 3: The long goatee beard
The long goatee beard is one of the most rebellious and trendy styles to choose, synonymous with rock stars and biker communities. More recently a favourite of Idris Elba and Brad Pitt, this is the perfect long beard style for most face shapes. The long goatee beard works well for men who want to show off a voluminous amount of facial hair. To achieve this look, there is no limit to how long your beard can be; you just need to make sure the chin hair is immaculately pointed at the bottom. Use a precision trimmer to create the goatee outline around your chin and fix in place with beard wax.
Style 4: The braided beard
The braided beard has grown in popularity in recent years, and is born of the Viking beard trend. Just as the fierce Vikings would plait their long beard into a single braid or ponytail before going to war, many facial hair enthusiasts choose to grow their beard to a minimum of four inches to achieve this striking look. Beard oil is essential for creating a beautiful braid for your beard. Separate into three equal size sections and braid (not too tightly), securing the end with a little beard wax.
Style 5: The big bushy beard
When it comes to natural big beard styles, there’s a fine line between good and bad. Popular in the ’60s and ’70s, the laid back big bushy beard can be an amazing classic look today given proper care. Just as there is a difference between a stylish bedhead hairstyle and unkempt hair, there is a difference between a beautiful big bushy beard and a neglected one. Out of all beard styles, this is the one in most need of occasional trimming with scissors to keep it looking its best. Use a beard comb to brush through any knots and tangles, and beard oil or beard cream to keep the hair in tip-top condition.
Lean the body over, take hold of a heavy weight, and raise it from the ground. In weight-lifting circles this is known as the ‘dead-weight’ lift or ‘hands-alone.’ It is exactly such a lift as a lot of powerful laborers or porters would naturally select if they wished to determine which the strongest man among them was. —Super Strength (1924) by Alan Calvert
The deadlift is arguably the most instinctually satisfying weightlifting exercise. As Alan Calvert, the father of the modern barbell’s design, alludes to above, it parallels a movement we already perform in our everyday lives: hoisting a heavy object off the ground. And it works the whole body, transforming the human physique into a very effective machine. Calling as it does upon the back, hips, arms, shoulders, grip, and more, what Calvert said of the deadlift almost a century ago still remains true: “[It is] possibly the most common test of strength in all the world.”
To fully enjoy the satisfactions and body-building benefits of the deadlift and use it as an effective, injury-free training tool, you will need to spend some time learning how to perform it correctly. There is more to it than bending over and picking up the bar or the traditional advice to “grip it and rip it” you’ll often hear at your local gym. In this comprehensive guide, we’ll cover the deadlift from every angle so that you can lift safer, heavier, and happier.
Calvert talked about the deadlift as training “The keystone of the arch of a man’s strength,” and in our age of functional fitness, we have yet to come up with a better exercise for building practical power. It particularly targets the back, hips, and core — strengthening musculature and connections in those areas that not only help you lift more weight, but sprint, jump, climb, and even throw better. But the effect of the deadlift doesn’t stop there: when done correctly it works the entire body — including muscles you may not think much about but arguably contribute more to an aesthetic physique, overall athleticism, and all-around injury-prevention than any other exercise.
Your quads extend your knees, contributing significantly to the lift. Your traps help control the bar as it tries to pull your shoulders into protraction at the bottom and depression at the top. Your latissimus dorsi muscles, the big muscles that help give your upper body a “V” shape, control the bar and keep it from swinging away from your body during the lift. The strength of your forearms and grip will be trained maximally as well. Just standing at the top of a heady deadlift places the entire body under stress. If it has any weak links, the deadlift will expose and remedy them. While you can train these individual muscle groups with dozens of lesser exercises, only the deadlift builds whole-body strength in a movement that you use every day.
The Deadlift Crib Sheet: 5 Easy Steps to Perfect Form
For quick reference here are the 5 steps to a perfect deadlift:
Stance: Stand so that your feet are directly under your hips, toes out slightly. Place your feet under the bar so that the bar is over the middle of your feet.
Grip: Take the narrowest grip possible that will place your hands outside your hips and legs.
Knees: Bend your knees until your shins touch the bar. Importantly, don’t undo Step 1 by pushing the bar forward with your shins.
Back: Without dropping your hips, lift your chest to set your back.
Push to Start: Drag the bar up your legs by pushing the floor away. Finish tall with your chest up, hips completely open, and knees locked.
The Devil’s in the Details: Breaking Down the Deadlift Form
Proper deadlift form accomplishes 2 things:
First, proper form makes the deadlift safe to perform at increasingly heavy weights. Problems arise when lifters make mistakes that cause extra movement in the barbell such as the bar swinging away from the body during the deadlift or when the lifter fails to maintain a rigid back, allowing the spine to flex while under load.
Second, proper form increases the efficiency of the lift. A rigid spine allows for the maximum effort to be directed to the bar, and correct lifting technique will cause the bar to travel in a straight vertical line, without inefficient deviations. An efficient deadlift allows the lifter to use as much muscle mass as possible, and lift more weight.
Being able to lift with the exact same (safe and efficient) form on every single rep takes practice. Fortunately, the deadlift is a relatively low-skill movement that is eminently repeatable. Every rep is a chance to dial in your form, and you should get it down before you start hoisting heavier weights.
The method of deadlifting presented here is not the only way to learn or perform the lift. However, it is laid out in a way that prioritizes the key components of safety, efficiency, and consistency. This guide puts particular focus on a methodical setup before troubleshooting specific problems. Benjamin Franklin might not have had deadlifting in mind when he said that “An ounce of prevention is worth a pound of cure,” but he might as well have.
The Setup
You will notice a theme in the deadlift setup: you move your body around the bar; you do not move the bar around your body. A perfect setup will accomplish a few things:
It will allow the bar to travel in a straight vertical line from the floor to the standing lockout position.
It will position your body to use the most muscle mass possible while keeping the bar over the middle of the feet.
It will eliminate extraneous movement that leads to wasted effort. The deadlift setup turns you into a lifting machine, where your whole body is dedicated to one job.
Now, let’s look at each step in the setup in more detail.
A Preliminary Note on Balance
The entire deadlift setup assumes one critical factor: That you are in balance during the lift.
“Balance” means that you are maintaining your center of mass (COM) directly over the middle of your feet. If you consistently feel like you are being pulled on your toes or that you are rocking back toward your heels during the deadlift, take a few minutes to learn how to feel your balance centered on your midfoot. Stand upright and rock slowly back and forth. Feel your balance shift toward your toes and feel the muscles of your leg engage to keep you from stepping forward. Rock back and feel yourself get back on your heels. If you rock too far one way or the other, you will have to take a step to keep from falling over. Finally, settle into the position where you feel the least amount of strain or effort. That is what midfoot balance feels like. The concept of balance determines much of what makes the correct deadlift setup the most efficient way to lift a barbell.
Feet
Intuitively, you probably know that the closer you stand to an object on the floor the more easily you can pick it up. The barbell is no different. The closer the middle of your feet are to the barbell, the better. The barbell is conveniently structured to allow you to slide your feet under the bar, placing the load directly over the middle of your feet.
What you probably think is the middle of your foot isn’t the middle of your foot. Most people think it’s nearer to their toes like this:
This is not the middle of your feet.
For a visual reference, the middle of your whole foot is about an inch from your vertical shins or directly over the knot of your shoes. To ensure the barbell is in the middle of your feet, just stand so that the barbell is about an inch from your shins. Here’s what that looks like:
At first glance, the bar probably looks far off from the middle of the feet; that’s because you’re only thinking of the part of the foot that extends in front of the leg; remember that half your foot curves around your leg to the back and terminates in your heel.
Don’t stand so close to the bar that your shins touch it. This will 1) result in the bar not being over your midfoot, and 2) throw off the rest of your deadlift setup.
Your stance should feel narrow, with your feet directly under your hips (with about 4-6 inches between your heels). Point your toes out slightly (about 15-20 degrees) and you are good to go.
Stance too wide and feet are not angled out.
You’ve taken deliberate care to set your feet in the correct position relative to the barbell. The goal for the rest of the setup is to move neither your feet nor the bar.
Gripping the Bar
Your grip determines the range of motion of the deadlift. The narrower your grip, the longer your arms will hang, and the shorter the range of motion will be. In general, a shorter range of motion means you can lift more weight.
Take a grip that is as narrow as you can make it while still being outside your legs and hips. Any wider and you are making the lift more difficult than it needs to be; narrower and your hands will be in contact with the top of your legs as you bring the bar up, making it difficult to hold onto the bar.
Grip too wide.
When you grip the bar, your shins should still be one inch away from the bar, like so:
Now just like there’s more than one way to skin a cat, there’s more than one way to grip a bar on the deadlift. Let’s talk about a few of those ways:
Double-Overhand Grip
When you are first starting out, you’ll want to use a basic, double-overhand grip: both hands facing you, gripping the bar in the same way you would a pull-up bar.
One thing to note about gripping the bar: the way you grip the bar will influence callus build-up.
While developing some calluses is necessary to protect the hands while barbell training, allowing your calluses to get too big increases the chances of a callus ripping off. That hurts. A lot. And a torn callus can prevent you from training.
As discussed in a previous AoM article on taking care of your calluses, when you grip the bar on the deadlift, don’t jam the bar in the middle of your palm. Gripping a barbell in the palms of your hands creates a fold of skin at the top of your palms. When you pull up on the barbell, the fold gets shoved down towards your fingers. This folding is what causes calluses to form.
Instead of holding the barbell in the palms of your hands, grip it closer to your fingers at the proximal digital crease. You won’t have that skin folding occur when you grip the bar there. Gripping the bar this way won’t eliminate callus build-up (which again, we want), but will go a long way in reducing excessive callus build-up.
At some point, your ability to lift weight is going to outstrip your ability to hold onto the bar. When this happens, you’ll want to switch to a different kind of grip for your heaviest sets while using the basic double-overhand grip for your warm-ups. The first kind of alternate grip to try out when your deadlifts get heavy is . . .
The Hook Grip
The hook grip traps the thumb between the fingers and the barbell, which creates increased friction and therefore, better grip security.
To take a hook grip, wrap your thumb around the bar first, then wrap your fingers around your thumb. Your fingers should only cover the top of your thumb, staying above the first knuckle. This means that for most lifters, only the index and middle fingers will be trapping the thumb against the bar. Be warned: This grip is uncomfortable and takes some practice. But it is secure enough to deadlift seriously heavy weights. Check out this hook grip video tutorial from Barbell Logic.
Mixed Grip
You may see other lifters gripping the bar with a mixed grip, one hand supinated (underhand) and one hand pronated (overhand). The mixed grip is perhaps the most common competition grip among powerlifters. As the bar starts to roll out of the fingers of the pronated hand it is at the same time rolling into the fingers of the supinated hand and vice versa.
The disadvantage of the mixed grip is that it loads your shoulders asymmetrically. Your prone arm is held in internal rotation and the supine side is in external rotation. Often this causes a “windmilling” effect on the supine hand in which the barbell rotates away from you during the pull. Windmilling makes the lift less efficient and much more difficult as you now have to spend extra effort controlling the bar. A swinging bar can also pull your back out of extension as the bar will suddenly become more difficult to lift. Just like a hook grip, the mixed grip may take some practice.
“I Know a Guy Who Tore His Bicep Tendon Using Mixed Grip!”
The mixed grip has a reputation for potentially putting a lifter at high risk of rupturing the distal bicep tendon on the supinated hand. While it is true that these injuries occur, the risk is likely exaggerated. Most of the time when these injuries happen, they are caused by jerking the barbell off the floor — a technical error — rather than the mixed grip itself. The mixed grip is not particularly dangerous if the lifter performs the lift correctly with fully extended elbows, and a smooth pull from the floor.
Knees
Once you’ve taken your grip, bend your knees until your shins touch the bar. Then shove your knees out until they touch your elbows. Take care not to move the bar. This step sets your hips in place for the deadlift, placing you in the best position to use as much muscle mass as possible.
This part of the setup separates the conventional barbell deadlift from other popular versions. The load that you lift in your hands and your body make up a system with a combined center of mass. That center of mass has to stay lined up with the middle of your feet for you to stay balanced. With a trap bar deadlift or a kettlebell deadlift, you can bend your knees as much as you like without changing the relationship between your combined center of mass and your midfoot balance point because your legs will not contact the weight. With a barbell, however, if you keep your legs too straight you are undercutting your quadriceps’ ability to contribute to the lift, and if you bend your knees too much your legs will roll the bar forward and away from your midfoot balance point. Every (successful) heavy barbell deadlift breaks contact with the ground directly over the midfoot and travels in a straight vertical line to the lockout position.
Hips
Your hips should not move from here on out. Very likely, you will feel like your hips are too high. Perhaps the most common mistake people make when deadlifting is to drop their hips and turn a deadlift into a squat with the bar in their hands. People do this because it’s easier to get your lower back into proper extension with your hips lower. But pause for a moment and consider the position that will put you in: You’ve placed your feet under the bar, taken your grip, and bent your knees so that they are just touching the bar. From this position, if you lower your hips, you must bend your knees, and bending your knees will cause the bar to roll forward, essentially undoing the first part of this setup and setting yourself up for an inefficient and unsafe lift.
If the bar is in the correct position over the middle of your feet, your shins are touching the bar, and you are in balance, then your hips will be in the correct position. Again, don’t move them from here as you finish the setup.
Setting Your Back
Setting your back is lifting shorthand for consciously assuming a position of normal vertebral extension. Maintaining your posture is critically important to barbell training but is made somewhat difficult when you’re bending over to grab a barbell. As soon as you start to lean over, your spinal column is not only being compressed but also exposed to opposing perpendicular forces. Your erector spinae, the muscles responsible for maintaining your posture and preventing the barbell from folding you in half are more than capable of handling this work, but the process of setting and maintaining a rigid back while in a loaded and bent over position is foreign to most people’s everyday experience. This makes setting your back and engaging the muscles that work to maintain your posture in a deadlift position perhaps the most difficult and uncomfortable part of the whole lift.
Note that when your back is set in extension it will cause your shirt to significantly wrinkle up in the back.
The most common cues to set your back are to lift your chest like you are trying to point your sternum at the wall in front of you, while arching your back like you are trying to point your butt at the wall behind you. As you set your back in line with these cues, do not drop your hips.
Setting your back should feel pretty uncomfortable. If you feel like you can set your back and hang out at the bottom of the deadlift for a minute or more, you are doing something wrong.
As mentioned, if you haven’t been deadlifting you’re probably inexperienced with maintaining a rigid back while in a loaded and bent over position; as a result, you may round your back as you lift, putting yourself at risk for injuries. Back injuries don’t happen just because you’ve rounded your back, but tend to occur when your back rounds while under a load and your spinal erectors spasm in an effort to protect your spine. If you tend to lift with a rounded back, your spinal erectors are not fully engaged, and the likelihood that you will elicit this kind of spasm increases.
While some powerlifters will intentionally lift with a rounded upper back, they do so in situations where the goal is to lift the most weight under the rules as possible. For general strength training, keep your upper back held in rigid extension, maintaining a “proud chest” for the entire movement.
Some lifters will lack the ability to voluntarily engage their back muscles and assume the correct position. Most often they will drop their hips in an attempt to set their back but will end up pulling with a rounded upper and/or lower back anyway. In these cases, it can be helpful to train voluntary control over the spinal erectors. A quick and simple way to do this is to use the “Superman” drill:
Lying prone, lift your arms in front of you and your legs up behind you so that your shoulders and thighs leave the floor. Squeeze for a slow 3 count, then relax. Perform 8 to 10 of these contractions. When you do this, you are giving your body a different task (lifting your thighs off the floor) that requires the same muscles used to control and maintain your posture. Now, stand back up; you should be feeling the modest strain in your spinal erectors from the drill. Use that feeling to reproduce the contraction. Squeeze and hold. Then relax. That is what it feels like to set your back.
Apply that feeling back to the barbell. Take your stance, grip, and hip position, then without dropping your hips, lift your chest and extend your lower back.
Arms
The best way to think about your arms’ job during the deadlift is that they are like towing straps. You do not pull the bar with your arms (in the sense of bending your elbows and pulling like you’re on a rowing machine or doing a pull-up). Any bend in your arms will be pulled straight as soon as you try to lift the barbell; in the process, some of the work of lifting the bar will be lost in this straightening that could have better contributed to the lift. Bent arms will also cause you to change position slightly as you start the pull.
Instead, you want to use your arms like straps by pulling them straight from the start when you set your back. Imagine you are trying to take most of the weight of the barbell into your hands just by pulling your arms straight and creating tension against the barbell.
Even though your arms are not actively pulling, it would be a mistake to think that the deadlift does not train your arms. Grip and forearm strength are particularly strengthened as you hold onto the bar as you lift it. In addition to developing a crushing handshake, a strong deadlift will help give your arms a strong, developed, muscular look.
Shoulders
Your shoulder musculature serves a stabilizing role in the deadlift. By hanging onto the bar, and assuming the correct setup position, your shoulders will be placed slightly in front of the bar and will do their job without the need for conscious action.
Some instructionals have suggested you should either retract your shoulder blades during the setup or that you should shrug or roll your shoulders back to finish the deadlift at the top of the movement. This is incorrect. A shoulder retraction will be immediately pulled out of place by the weight of the barbell hanging from your scapulae. At the top, you should be standing tall with no need to actively set your shoulders in any position.
Some people will find that they finish their deadlift with rounded shoulders. If this is the case, they need to set their upper back in extension better at the bottom of the lift and keep a proud chest throughout the movement.
Head
The ideal head position for a deadlift will place the cervical spine in a neutral position throughout the entire movement.
The most common mistake here is for the lifter to crane his neck backward as if he is trying to look straight ahead. This adds discomfort to an already uncomfortable movement and raises the potential for straining your neck muscles as a consequence of the awkward positioning.
Some lifters also bow their head and look down between their legs when setting up for the deadlift. This will cause your upper back to round.
Better: Look at the floor 7 to 10 feet in front of you and keep your eyes there. This will help you control your head position and give you a fixed point to stare at as you fight to maintain position and balance during the lift.
Executing the Lift
Most deadlift errors are prevented with a good setup. If you did the above steps correctly, your body and the bar are now in the correct position relative to each other. To complete the lift itself, there are a few things to keep in mind.
Pulling the Bar
As alluded to above, calling the deadlift a “pull” is somewhat of a misnomer. You are not really pulling the bar with your arms, and in fact, it helps to actually think of the deadlift as a “push.”
To start each repetition, you push with your feet. This may seem contradictory to our emphasis on the deadlift as a back and hip dominant exercise. But if you are also maintaining a rigid back and hip angle as you push with your feet, this push will not only extend the knees, but initiate the powerful hip extension needed to complete the lift.
You can think of the push as a movement cue as opposed to a description of the deadlift. When you push to start the deadlift you will better coordinate the multiple joints and muscle groups that suddenly need to kick into high gear.
This also prevents one of the most common deadlift mistakes, which is the aforementioned attempt to deadlift by turning it into a squat, and dropping the hips and lifting the chest to initiate the movement. You will notice this mistake because the lifter’s hips will lower and the bar will move away from his body. The lifter’s knees will also travel forward, necessitating that the bar travel around the knees, instead of traveling in a straight vertical line.
Make sure you maintain contact between the bar and your legs all the way up. Imagine you are trying to grab the hem of your shorts with the barbell. If you did everything else correctly, this contact ensures the bar is traveling in the most efficient path possible. It is a mistake, however, to bend the knees, creating a ramp out of your thighs. It is cheating in powerlifting to rest the bar there or to try to jerk and hitch the bar up your legs.
Lockout
The deadlift should finish with the lifter’s hips and knees extending fully at the top at the same time. The lifter should be standing, with his chest up and shoulders down, as if he were standing at attention. You should feel comfortable in this position, like you could stand there for a few minutes and carry on a conversation while holding the weight in your hands.
Common Lockout Mistakes
A few common mistakes that we often see at the lockout are:
Leaning Back
Crossfit used to judge a completed deadlift by whether the lifter’s shoulders were behind the bar at the top. This has led to many lifters learning to exaggerate the top position of the lift. But trying to lean back tends to cause people to “hitch” or ramp the bar up their legs, a movement that decreases the efficacy of your hip extensors to finish the lift. Focus on finishing tall, locking your knees, and squeezing your glutes at the top.
Shrugging Your Shoulders
“Shrugging” or scapular elevation is a primary function of your trapezius muscles (traps). Your traps are critical to the strength and stability of your shoulder girdle. While strong traps are essential to heavy lifting, “shrugging” isn’t their most common, daily function. As stabilizers, the traps resist scapular depression (the opposite of shrugging). The deadlift trains your traps for exactly this function automatically without you needing to do anything other than to keep your chest up and stand tall at the top. Heavy shrugs are a useful assistance lift for advanced lifters, but should be trained separately from the deadlift. Like leaning back, shrugging at the top is unnecessary and potentially takes away from the more important aspects of the lift.
Hitching to Finish
If you find that you have to re-bend your knees to finish the lockout, it’s likely your back wasn’t fully extended when you started the lift. If you have trouble setting your back, you may need to improve your conscious control over its extensor muscles. If you still have trouble setting your back, try adjusting your stance. Take a slightly more toes-out position and push your knees out to touch your elbows during your setup. This both creates room for your torso and allows you to bend your knees a little bit more, both of which can help you set your back.
Lowering the Bar
Setting the bar down is quite literally the exact opposite of the concentric phase of the deadlift. Stay tight and slide the bar back down your legs, initiating the descent first by bending at your hips, then by bending your knees once the bar passes your kneecap. When you’re setting the bar down don’t round your back . . . and don’t, don’t, don’t drop it!
You’ve probably seen bros and Crossfitters drop the bar at the top of the deadlift. Don’t imitate them. The practice of dropping the bar comes from strongman competition rules. Strongmen are also allowed to use straps and hitch the bar up their legs. Their goal is to get the bar from the floor to the lockout by whatever means possible. Your goal is to use the deadlift to train in the most efficient, effective way possible, and dropping the bar is counterproductive to that goal. Here’s why:
First, lowering the bar to the ground is part of the lift. When you drop the bar at the top of the lift, you’ve just performed half a deadlift.
Second, dropping the bar on a deadlift is bad for the equipment.
Finally, dropping the barbell on a deadlift annoys other gym members. It’s loud.
Instead of dropping the bar, keep your hands on it and stay in control over it all the way to the floor.
Common Deadlift Mistakes
Many deadlift errors are those that deviate from the setup steps above: If the bar is over the middle of your foot and stays there, your hips stay high, and your back is set, you will avoid the most typical of them.
But a few issues may occur between the setup and the lockout; here’s how to address them:
Mistake #1: Lifting too quickly or “jerking” the bar off the floor.
Some people jerk the bar off the floor. What they’re trying to do is build some momentum in the lift before the plates break contact with the ground. Sounds like a good idea, but it isn’t.
When you jerk the bar off the ground, you typically pull your back out of extension, move the bar, or upset some other part of the carefully coordinated setup outlined above. Telltale signs that you are jerking the bar from the floor include your back rounding as you start the pull, usually before the plates break contact with the ground; elbows bending before straightening as you start the pull in a “jerking” or “yanking” motion; or a loud “click” as you start to lift and the bar is pulled tight against the sleeves and plates on the end.
Instead of jerking the bar off the floor, concentrate on squeezing it off the floor. To squeeze the bar off the floor, focus on taking all the slack out of it. You do this as you set your back, pull your arms and wrists straight, and begin to carry a significant amount of the barbell’s mass in your hands.
Note: The plates don’t leave the ground yet. You know you’ve successfully “squeezed” when everything in your body feels tight, taut, and uncomfortable. If you have enough weight on the bar, you may notice that the bar bends a little while the plates are still on the ground.
When you squeeze before you lift, your spinal erectors are in a better state to pull a heavy load, and your body is ready to pull the bar with gusto.
Mistake #2: Losing contact between the bar and your legs.
In the correct deadlift setup, the lifter’s shoulders will be slightly in front of the bar so that the arms hang at a slight angle (somewhere between 7-10 degrees). This puts the barbell directly under the scapulae. If you imagine the bar hanging from the lifter’s arms like a plumb bob, the bar wants to hang in this position directly under the joint from which the arms are attached. If the bar is directly under the scapulae, it is doing just that. In addition, the big powerful latissimus dorsi muscles are responsible for the “sweeping back” motion that keeps the bar on your shins. Together your setup and your lats should ensure that the bar stays on your legs on the way up.
If not, either your setup is incorrect or your lats are not doing their job well. When the bar swings forward and away from you, it may be that your shoulders are too far in front of the bar. Rock back slightly and make yourself heavy on the middle of your feet to help recalibrate the correct position.
In addition to addressing your setup, good thoracic extension (the proud chest position) and active engagement of the lat muscles will help keep the bar on your legs. Lean over the bar and roll it away from you then toward you without moving your feet. Your lats are responsible for rolling the bar toward you. Pay attention to how they feel when they are engaged and use them to actively keep the bar on your legs throughout your setup and pull.
Mistake #3: Losing balance.
If you feel yourself on your toes or heels during the lift, you are not completely in balance. It’s worse if you notice that your toes or heels lift off the ground during the lift, as you are likely wasting a lot of energy just trying to keep from taking a step.
Stay heavy on your whole foot throughout the lift. A heavy barbell changes your center of mass, so pay attention to how your weight is distributed on your foot so that the bar does not pull you forward and so that you stay over the bar for an efficient lift.
For further learning on how to identify and correct common deadlift errors, check out this video.
If you’re still having trouble with your deadlift form, an online coach can help you clean things up quickly.
How to Breathe When You Deadlift
Most people have been told that the proper way to breathe while lifting weights is to inhale on the way down and exhale on the way up. Using this suggested breathing pattern on the deadlift would mean exhaling while you pull the bar up, and inhaling while you lower the bar.
Many fitness trainers tell their clients to breathe like this because it ensures your blood pressure doesn’t get too high while lifting, preventing you from passing out or having a stroke.
While this breathing advice is well-intentioned, it’s misguided.
Instead of breathing in while you’re pulling the bar up and exhaling while you’re putting the bar down, you’re going to instead perform what’s called the Valsalva Maneuver. Here’s how to do it:
Before you pull up on the bar, take a big belly breath. When you take your big breath, you want your belly to expand, but you don’t want your chest to get big. Think “breathe into my belly.” You’re not really breathing air into your belly. That’s just a cue for you to get the deep breath we’re looking for.
Close your glottis and exhale against it. The glottis is what allows air to go in and out of your windpipe when you breathe. When you close your glottis and exhale against it, air can’t escape your lungs, which in turn elevates intra-abdominal and intra-thoracic pressure. This provides your “core” the stability it needs to perform a heavy lift. More on this below.
Perform the entire deadlift while continuing to exhale against your closed glottis. Do not let air out while going up. Continue to exhale against your closed glottis as you lower the bar to the ground.
Let the air escape from your glottis after you’ve lowered the bar to the ground. After you complete the rep, you can release the air from your glottis.
Repeat the process for the next rep.
Performing the Valsalva Maneuver while you deadlift creates a lot of internal pressure in your torso. This increase in abdominal pressure turns your normal day-to-day, sponge-like core into a stiff, telephone pole-like core. That rigidity is what protects your spine while you’re lifting heavy weight and it makes for a more efficient deadlift — rigid structures transfer force better than spongy structures. The Valsalva Maneuver is what allows you to “brace yourself” for a heavy deadlift pull.
The most common breathing mistake beginners make with the Valsalva Maneuver is that they’ll hold their breath for the entire set of deadlifts. Don’t do this. It will at best give you a really bad headache when you’ve finished the set; at worst it’ll cause you to pass out.
As to the safety of the Valsalva Maneuver, there’s no evidence in the research that suggests that breathing this way while lifting will increase the chances of having a stroke, an aneurysm, or chronic high blood pressure. The one caveat is that it could be dangerous for folks with intracranial aneurysms.
You may find different types of barbells at your local gym: “standard,” Olympic, fixed plate bars, trap bars, and specialty barbells, including deadlift-specific bars. Most of your deadlift training should use an Olympic barbell. These bars are 28-30 mm around the shaft with rotating 2-inch loadable sleeves. Fixed plate barbells or “standard” size bars (those with narrower, 1-inch diameter sleeves) either will not be heavy enough or will bend when loaded with heavy weight.
If you are lifting at a well-equipped, old school, “black iron” (metal plates) gym, they may have a deadlift bar available. Deadlift bars are usually a little bit longer than a regular Olympic barbell. They are also more flexible than an all-purpose bar. The flexibility allows deadlifts to pull a lot of slack out of the bar before the plates break contact with the ground. With some practice, this allows lifters to lift significantly heavier weights by turning the deadlift into more of a low rack pull. Deadlift bars are fun, but should only be used in practice for a competition which will be using a deadlift bar, or as an intentional means to overload your regular deadlift.
Plates
The deadlift is pulled from a standard, if somewhat arbitrary, height. The correct deadlift height is where the barbell will sit when loaded with standard 45 lb (or 20 kg) “Olympic” plates — about 9 inches from the floor to the bottom of the barbell shaft. You can use either 45 lb iron plates or 45 lb rubber bumper plates for your deadlift.
The bar’s height can drastically change lifting mechanics. So, it is important to lift from the standard deadlift height every time you train. If you are warming up or working up to lifting more than 135 lbs (a 45 lb plate on either side of the bar), you will either need large diameter “bumper” plates or a rack that will allow you to set the deadlift to the standard height. Do not try to deadlift from the floor with small plates; it is especially difficult to set your back and learn proper form if the bar is much lower than 9 inches from the floor.
Belt
Contrary to popular belief, a weightlifting belt itself doesn’t provide support to your back. It doesn’t act like some sort of exoskeleton that makes your back magically stronger simply by putting it on.
What the weightlifting belt actually does is provide a proprioceptive cue to your torso to squeeze and tighten your core muscles harder when you’re lifting a really heavy weight. Just as you can tense your bicep muscles more when you’re curling 20 lb dumbbells than when you’re curling a couple of soup cans, your core muscles can tense up more when they’ve got something to push against. The weightlifting belt provides that pushback.
So instead of directly supporting your torso, a weightlifting belt indirectly supports it by providing feedback to your core to tighten and make itself as rigid as possible.
The key to properly using a lifting belt is that you must first learn to lift and brace properly without one. Otherwise, it won’t help you. When you do have the basics down, however, it will make your lifts more secure and help you be better able to handle the increasingly heavier loads of your training. The exception to this rule is that if you have an existing back problem, get a belt right away. Otherwise, you can invest in a belt after the first few months of training.
A lifting belt makes setting your back during the deadlift a little more difficult. By essentially increasing the girth of your torso, you now have to contend with increased contact between it and your thighs as you try to set your back. This makes it harder to set your back, particularly with a standard 4-inch belt. You can resolve this issue in 2 ways: 1) wear your 4-inch belt a little bit higher on your torso, or 2) switch to a 2- or 3-inch belt. Brett has used a 3-inch belt for all of his lifting career.
When you are considering which belt to get, you will want to look for 3 things:
High quality leather construction with a consistent width across the entire length of the belt. 4-inch belts are probably the most common, but 3-inch belts are more versatile, fitting shorter lifters and allowing you to use the same belt for deadlifts that you use for the other lifts.
A single prong fastener. Double prong lever belts, and velcro belts are available as well. You should avoid the latter. The former is acceptable, but single prong belts are easier to adjust and take off after your sets.
6-10 mm thickness. Powerlifting belts tend to range from 10 mm to 13 mm in thickness. But anything more than 10 mm tends to be excessive for general strength training. A 6-10 mm belt will be flexible enough to use from the start and will still last you a lifetime.
When you lift weights, you want to wear shoes as it keeps your toes safe and provides traction between your feet and the floor.
But most athletic shoes provide compressible soles for comfort. While compression in your shoes is good if you’re running and jumping, when you perform the deadlift, you want as little compression as possible as this will allow you to produce maximal force during the lift.
Think about it this way. Would it be harder to deadlift while standing on a mattress or on a hard floor? Well, a mattress, of course. When you deadlift on a mattress, the force you generate will be absorbed by the mattress, making the lift harder to execute. When you deadlift in running shoes, the cushioning in the shoes gives you the same experience as deadlifting on a mattress.
So when it comes to shoes and deadlifting, you want to deadlift in a shoe that has an incompressible sole. Chuck Taylors and minimal running shoes are good examples of shoes with nearly incompressible soles. There’s hardly any cushion between your feet and the floor. These can serve as good shoes for the first-time deadlifter.
But if you’re serious about barbell training, and we hope you are, then we highly recommend that you invest in a pair of specialized weightlifting shoes.
A typical lifting shoe has 3 basic components:
An incompressible sole
A slight heel raise
A metatarsal strap to keep your foot from sliding around in the shoe; heel heights are usually about 1/2″ – 3/4″, which suits most lifters
With a raised heel you are a tiny bit taller than you would be in flat shoes or bare feet. The distance you have to pull the bar is now a little bit farther. More distance to pull the same weight means more work; more work takes more energy. So, arguably when you deadlift in lifting shoes with heels, you are giving yourself a slight handicap. But for most lifters, the difference is negligible. The stability the weightlifting shoe gives you while performing the deadlift far outweighs this miniscule handicap.
A Note on Going Shoeless or in Slippers
You’ve likely seen some people choose to ditch footwear entirely when it comes to the deadlift. Many very heavy deadlifts are pulled every day sans shoes. The idea is that by deadlifting without them, you reduce the range of motion required, meaning you don’t have to pull the bar as far.
The downside of lifting without shoes is you do lose some traction between you and the floor. This is especially true if you’re lifting in socks on a hardwood floor. That can get slippery. To get the range of motion benefit of deadlifting without shoes but with added traction, some powerlifters perform the exercise in deadlift slippers. These look like ballet slippers, and have a nice leather sole that provides traction between you and the floor.
For novice lifters, lifting without shoes should come much later in the development of the athlete. Start by deadlifting in your lifting shoes. The design makes them safe and effective for all barbell training, and shoes will keep your feet covered and protected while you train. At some point, however, you will have enough reps under your belt that maybe you will notice the difference half-an-inch makes to your setup.
Straps
Lifting straps are usually made of nylon, leather, or canvas. They wrap around your wrist and around the barbell to ensure a secure grip. LIfting straps (with some practice) remove your grip from being a factor in how much you can deadlift. Humans can generally lift more than they can hold onto. So, straps come with a double-edged benefit: they allow you to deadlift more weight, but they stop the deadlift from being an exercise that strengthens your grip.
There are 3 main reasons to use lifting straps:
You are unable to use a hook grip for your heavy deadlifts and choose not to use a mixed (or alternate) grip. In this case, you should pull as many of your warm-up sets with a standard double-overhand grip as possible, possibly adding some static holds at the top to help develop your grip strength.
Your job or sport is heavily dependent on grip strength. When the things you do outside the gym both train your grip and leave your mitts fatigued for the things you do inside the gym, straps can be a good option. In these cases, your grip strength is getting enough training, and unless you are competing in a lifting meet, you may not need to practice lifting with a hook grip or mixed grip.
Deadlift assistance work: When it comes to doing supplementals lifts (see below) to improve your deadlift, it’s okay to use lifting straps with them in order to save your grip for your main deadlift training.
Straps are a useful training tool under the right circumstances, but you don’t need to use them when you’re first starting out. Wait until you’re several months or even years into your training. For example, Brett didn’t start using straps until 2018 and he had been training for 4 years by that point.
Chalk
Magnesium carbonate or “chalk” is more like water and lifting shoes than it is like a belt or lifting straps, meaning it should be a constant in your training. So what does chalk do?
The most commonly cited reason to use chalk is that it improves our contact with the bar. For the deadlift, specifically, we want something that will help us hold onto the bar without taking away from the grip-training benefit of the lift.
Chalk keeps your hands dry, allowing you to train and rely on your grip without the lubrication effects of sweat acting on the bar. Some commercial gyms do not allow chalk, and thereby impinge on your ability to improve your deadlift. Even if you dry your hands without chalk before stepping up to the bar, you will be sweating during the lift when it is heavy enough to matter.
If you aren’t using chalk already, here are a few tips for doing so:
Don’t break the chalk: Lifting chalk comes in blocks and should stay in that form as long as possible; this allows you to apply chalk to your hands in reasonable amounts, in the right places, without making a mess.
Ask forgiveness, not permission: If your gym doesn’t provide chalk, you can bring your own. Climbing bags make for great chalk carriers.
Liquid chalk in a pinch: Liquid chalk, like Liquid Grip, isn’t as good as a big block of magnesium carbonate, but it will get the job done. It has the added benefit of being discreet and less prone to messiness than regular chalk.
Moderation: While chalk is beneficial for your grip, you don’t need to bathe in it. Apply it, rub your hands, and lift.
If your hands get excessively sweaty, even with chalk, try wearing sweatbands on your wrists; they’ll catch the sweat that would otherwise run down from your arms and onto your palms.
How to Train the Deadlift
There are scores of useful programs that can help you build your deadlift. More important than any program, though, is good form and consistency. If you aren’t sure where to start, here are some general programming guidelines that will fit in with most strength training regimens.
For a 3-4 day per week lifting program, you should be training your deadlift twice per week. Depending on how long you have been training, these sessions will include some of the following: intensity training, volume training, and/or supplemental lifts (more on what all of these terms mean below). How you structure this will depend on your lifting history and current program. An online coach can help you craft a program suited to your needs. Here are some ideas to help you get started:
Novice
A novice lifter is someone who can add weight to the bar regularly and still recover for their next session. If you haven’t been deadlifting regularly or are just now adding this lift to your program, treat yourself as a novice: Start light and add weight slowly but steadily to one top set/working set (the set of repetitions done at the weight you’re programmed to lift that day, or in this case, the heaviest you can do) of 5 repetitions each deadlift day.
Your first deadlift session should be mostly about practice. Pick a starting weight that is very light for you and practice the five-step setup for sets of 5 repetitions until you feel like you’ve got it down. Then add weight in 5, 10, or 20 pound increments for sets of 5. When you reach a weight where the bar starts to slow down a little bit on your 4th or 5th repetition in a set, stop and call it a day. That’s day one.
Next time you deadlift, add some more weight. Begin by warming up with a light weight, and work up to one top set of 5 repetitions that is 5 to 10 pounds heavier than your previous workout. Let’s say your goal is to lift 225 lbs for a single top set of 5 reps. Your deadlift workout might look like this:
Warm-up:
135 lbs 1×5 (sets X reps)
160 lbs 1×5
180 lbs 1×3
200 lbs 1×1
Work/top set:
225 lbs 1×5
Most men will be able to add 10 pounds every deadlift session for 4 to 6 workouts. After that, switch to 5-pound increments. The goal is not to lift maximally heavy weights right now. The goal is good form and steady progress for as long as possible.
Intermediate to Advanced
Unfortunately, you cannot add 5 pounds to the bar 2X per week forever. After a while, you plateau and find you cannot lift heavier weights. At this point, change one of your deadlift days to a lighter “volume” day. Volume typically means doing more reps at a lighter weight. Instead of one set of 5 repetitions like you have been doing, take the weight down to about 80% of your last heavy deadlift day and perform 3 sets of 5 repetitions. So on your volume day, you’ll be doing 15 total reps instead of just 5.
From here you can alternate this volume day with an “intensity” day. Intensity simply refers to the weight on the bar (usually thought of as a percentage of your maximal strength for one rep). Your goal for the intensity day is to increase the weight on the bar. Think of intensity days as your day to set new personal records on the deadlift. If you did 315 for a set of 5 on your previous intensity day, on the next intensity day your goal is to do 320 for a set of 5.
Eventually, you will not be able to add weight to the bar for a set of 5 repetitions. Things just get too heavy. When that happens, change your one set of 5 (1×5) reps to 2 sets of 3 (2×3). 2×3 can eventually become 5 sets of 5 single reps (5×1). When you can no longer add weight to your 5×1 intensity day workout, start alternating week to week: Week 1: 1×5, Week 2: 2×3, Week 3: 5×1. This varies both the stress and spreads out the weight increase across 3 different intensity ranges. With careful management, this progression can last a very long time, with you hitting regular deadlift PRs on an almost weekly basis.
Eventually, just deadlifting 2X per week won’t help you make progress. You either need a new stimulus or you need to train out weaknesses in your kinetic chain. Supplemental lifts, which are variations on the standard deadlift, can help you do just that.
When should you add supplemental lifts? It will be different for every lifter. Generally, supplemental lifts are introduced when a lifter shifts to intermediate and advanced programming. For example, on a volume day, you could replace the traditional deadlift with a deficit deadlift for 3 sets of 5. On intensity day, you could replace the traditional deadlift with a set of rack pulls at a really heavy weight.
To help you pick the best supplemental lifts, stick as closely to the following selection criteria as possible: prioritize lifts that 1) use the most muscle mass, 2) over long ranges of motion, and 3) allow you to lift a lot of weight. Stick to big, multi-joint movements at first as these will have the best carryover to your deadlift.
The following non-exhaustive list of variations meet this criteria and can be useful lifts for training your deadlift when used properly:
Stiff-Legged Deadlift(SLDL)
The SLDL is just like a deadlift without the step where you bend your knees and bring your shins to the bar. By keeping your legs straighter, it removes the quadriceps from the lift, making the lift more difficult and focusing the effort on your hip extensors. You can use the SLDL variation to add volume to your deadlift program without as much stress as a full deadlift and to help you focus on training your hamstrings and glutes.
SLDLs usually fit in an intermediate program for 3 sets of 5-8 repetitions.
Deficit Deadlift
If you struggle from the floor, a deficit deadlift will force you to focus on this weakness. Deficit deadlifts add distance to your deadlift. To perform a deficit deadlift, stand on a mat or other surface that raises your body up to 2 inches higher than normal. The deficit deadlift makes the deadlift much more difficult by adding significantly to the range of motion and making it more difficult to get into the setup position. Use the deficit deadlift to improve the bottom of your deadlift.
Doing deficit deadlifts for 5 sets of 3 as your supplemental volume deadlift works very well. Leading up to a competition, add weight but cut the reps down to doubles or singles.
Rack Pull
Almost the opposite of a deficit deadlift, the rack pull is a lift that you traditionally lift inside a power rack from the spotter arms, placing the bar’s height just below your knees. The higher bar position significantly decreases the range of motion, allowing you to lift more weight. Rack pulls train the top half of your lift and tend to be more stressful for lifters than a conventional deadlift. They allow you to feel the heavier weight in your hands and train a strong lockout.
Use the rack pull on your intensity day and train it as you would your conventional deadlift.
The RDL starts from the rack and uses a stretch reflex. It has a much shorter range of motion compared to the full deadlift, but lifters often can handle a high percentage of their conventional deadlift weight when performing an RDL. Due to the stretch reflex at the bottom, RDLs tend to be less stressful than a conventional deadlift.
Intermediate to advanced lifters can train RDLs for 3-5 sets of anywhere from 3-8 repetitions.
Paused Deadlift
Paused deadlifts are a great lift to help teach lifters to utilize and keep their lats tight throughout the lift. To do one, perform a regular deadlift, but when the bar reaches about halfway up your shins, pause and hold it there for 2-3 seconds, then continue all the way up to the top. Repeat.
Intermediate to advanced lifters can do paused deadlifts for 3 sets of 5.
Frequently Asked Questions
Can I deadlift with a Smith machine?
No. A Smith machine takes away some of the most useful parts of the deadlift. The need to exert control over the bar and stay balanced during the lift are integral parts of what makes the deadlift (and every other barbell lift for that matter) an effective strength training tool.
I have a bad back. Can I deadlift?
You can and you should. With very few exceptions, the deadlift is not only safe for your back, but it trains the muscles of your back to help protect your back from further injury. Many lifters with chronic back pain also report a decrease in pain with regular barbell training. The keys are to start at an appropriately manageable weight and progress slowly with perfect form.
You certainly can sumo deadlift. Whether you should is a more complicated question.
The sumo deadlift is a competition-specific lift that has gained popularity among the general strength training population. Sumo deadlifts place your feet very wide and your hands inside the legs. These changes bring the lifter’s hips closer to the bar, shorten his legs, and lengthen his arms, reducing the overall movement in the lift and the overall range of motion. These changes to the lift increase its pure mechanical efficiency, allowing some lifters to move incredible amounts of weight with it. But what the sumo deadlift gains in efficiency, it loses in effectiveness for building general strength as compared to the conventional deadlift.
The sumo is sometimes considered a supplemental lift to the conventional deadlift, rather than a replacement. But there are other supplemental lifts that carry far more benefit for general strength training.
Bottom line: there is little reason for a non-competitive lifter to use the sumo deadlift. If you do compete in powerlifting, and the sumo is your go-to competition style of deadlift, then you should practice the sumo deadlift for competition, but continue to train your conventional deadlift for general strength.
Can I deadlift with kettlebells?
Kettlebells can be appropriate for new lifters who need but don’t have access to a sufficiently light barbell. There are 2 problems with this approach, however. First, kettlebells come in 4 kg increments (8.8 lbs). Eventually you will either run out of kettlebells to deadlift or you will need a smaller increment between one weight and the next. Either way, you are going to need to graduate to a barbell deadlift for longer term lifting. The second problem with kettlebells is that the mechanics of a kettlebell deadlift will be different from the barbell deadlift. The kettlebell deadlift will be more squat-like.
Yes. You include the weight of the bar when determining the weight of your personal record. Most barbells weigh 45 lbs.
No. Lowering the barbell down to the starting position is part of the deadlift. When you drop the barbell at the top of the deadlift, you’ve only done half a rep.
Not really. With consistent training, an average man should easily be able to deadlift 405 lbs.Tags: ExercisesPREVIOUSNEXT
The image of a car dangling over a cliff is one of Hollywood’s favorite go-to moments of suspense. In real life, finding yourself in that situation is quite a bit rarer, but it’s certainly not unheard of. When you consider the number of human-made “cliffs” like highway overpasses and bridges, there are ample opportunities for a basic fender bender to turn into a serious cliffhanger. If you find yourself behind the wheel of a precariously positioned car, the key is to avoid any sudden movements and plan your route of escape with everyone else in the vehicle. Be aware that opening doors shifts a significant amount of weight toward the front of the car, so take caution before immediately bailing out. With that in mind, here’s how to get out alive.
1: Prepare to move. If the car is moving/sliding, you’ll need to execute these steps quickly but smoothly.
2: If front doors are over solid ground, escape that way, using the window if it seems that opening the door would shift too much weight.
3: If front doors are hanging over cliff, set parking brake (which locks the rear wheels), turn off engine, and unbuckle seatbelt.
4: Gently shift any available weight, like bags, to the rear.
5: Slowly recline your seat as far back as it will go, and move to the back of the vehicle.
6: Exit through the back door if possible, or rear window/windshield if needed (use a screwdriver or escape tool to break glass).
Most people think of shrugs as the go-to exercise when it comes to training the traps.
But you have to realize that doing shrugs alone WON’T get you the most complete trapezius muscles. This single exercise is missing some very important elements of trap training.
Another common problem is that many people end up overtraining their traps and causing muscle imbalance and posture problems. This is a mistake that you definitely want to avoid!
I’m going to show you why shrugs aren’t the best exercise for the traps, help you understand how to keep from overtraining them, and give you a fast and simple way to incorporate complete trap training into your workouts.
Before we get started let me ask you a question. When you think of the traps is this what comes to mind?
Most people do, and that’s part of our problem. This is not the traps, but just the upper traps. If this is how you are thinking of the traps, you’re forgetting to train two thirds of the muscle you’re trying to grow!
The trapezius is a kite-shaped muscle which is divided into three zones (upper, middle and lower) due to the orientation of the muscle fibers along the belly of the muscle in each of these zones. Once you can see the complete picture of the traps, you realize that a straight up and down shrug is not enough to hit the entire muscle optimally.
In order to have a fully developed back, more importantly, a fully functional back, you need to make sure you’re not just training the upper trap, but the middle trap and lower trap as well. When you train all 3 zones of the traps, your shoulders can work more efficiently and effectively.
As I always say, you want to make sure to ‘follow the fibers’ to train a muscle optimally, so you need to have exercises and strategies in place for doing this in your traps training.
Mistaking just one small part of the traps for the whole muscle is just one common mistake many people make in their trap training. Next I’m going to discuss why overtraining is a real danger for your upper traps, how to avoid it, and how to be sure you’re hitting all 3 trapezius zones. Before I do that, let’s take a quick look at the location of the upper, middle and lower traps.
WHY THE UPPER TRAPS ARE AT RISK FOR OVERTRAINING
When it comes to training the trapezius muscle, the upper traps are what get most of the attention because it’s what stands up tall making us look like we’re larger and have a bigger neck.
However, I don’t really program a lot of direct upper trap work into our programs. There’s a good reason for this!
We can actually target the upper traps pretty efficiently with some of our compound movements that form the foundation of our training.
Performing the heavy compound lifts like the deadlift, row and carry are an incredible way to build bigger thicker upper traps without having to add in specialty exercises on top.
Below are a few examples to illustrate how these exercises definitely incorporate the traps:
A heavy deadlift is certainly going to overload the upper traps especially if you go a little wider on your grip.
You can see my upper traps working hard in this deadlift.
A row is another compound exercise that can definitely overload the upper traps.
My upper traps are being overloaded in this barbell row.
The farmer’s carry is an endurance based move that is a very effective way to load the upper traps.
The farmer’s carry is another foundational move that is great for loading the upper traps.
Since many of our foundational movements incorporate the upper traps, you don’t necessarily need to have a lot of upper trap work in your training program. As a matter of fact, if you do train upper traps separately you have to be careful about overtraining them if you’re also performing compound movements.
The overdevelopment of the upper portion of the traps at the expense of the middle and lower will create muscle imbalances that feed into shoulder dysfunction and faulty posture over time.
Overtraining the traps can lead to some serious problems including muscle imbalance, postural issues, a dominant forward shoulder, shoulder weakness and upper cross syndrome.
We don’t want to go down that path, so we need to make sure that we’re training the upper traps cautiously as well as incorporating movements for the middle and lower traps.
When it comes to building big traps, it starts with making sure you’re not forgetting to train two thirds of the muscle you’re trying to grow. In this video, I’m going to show you a huge trap workout mistake that many people make, and it winds up costing them the overall size and development of their trapezius muscles.
The first thing you want to do is make sure you understand what the traps muscle actually encompasses before you start training it. Because the muscle is essentially divided into three zones, due to fiber orientation changes along the belly of the muscle, you realize that a straight up and down shrug is not enough to hit the entire muscle optimally.
The traps are comprised of an upper, middle and lower portion. These are aptly named because of the orientation of the muscle fibers of the muscle belly within each of these zones. Since we always say here on this channel how important it is to follow the fibers when you are trying to optimally train a muscle, you want to be sure you have exercises and strategies in place for doing this in your traps training.
Since the upper traps are often times targeted with shrugs, most people who lift do not need to get any additional coaching on what exercises to do to hit this area. For those that do however, be sure to watch our traps workout videos here on this channel for more science based exercise options for how to do this properly. The important thing to note however, is that overdevelopment of the upper portion of the traps at the expense of the middle and lower will create muscle imbalances that feed into shoulder dysfunction and faulty posture over time.
This is something you definitely want to avoid. For this reason, many times I will not directly program exercises for the upper traps specifically into my programs. I know full well that performing the heavy compound lifts like the deadlift, row and carry are an incredible way to build bigger thicker upper traps without having to add in specialty exercises on top.
That said, you can perform these big compound moves and still be lacking development in the other two thirds of the muscle. So, when you want to effectively target the middle fibers of the traps you should really look into performing the wrap around row exercise shown here. This should be done with the elbows bent to minimize the action of the rear delt and make the scapular retraction come primarily from the middle trap fibers.
Likewise, if you don’t focus on specifically trying to target the lower traps then you are likely to have weak or undeveloped muscles in this area. The prone dumbbell press is a great exercise option for hitting this area. The key here is not to focus on the amount of weight that you are lifting. Instead, focus on the quality of each contraction. These lower trap fibers are usually very underdeveloped and need your improved mind muscle connection in order to flourish.
Keep the weights low but the tension high and you will find that your overhead pressing mechanics will improve as well as your shoulder safety as this gets stronger.
If you are short on time and want to use one exercise that you already should be doing already, then you have the option of the face pull press modification. This is an absolutely tremendous way to train your traps without having to add in many additional sets of separate exercises. Perform the face pull as you normally would and then add the additional overhead press to engage the lower traps. The act of pulling back on the cable or band alone is enough to fire up the middle and upper traps into the exercise.
For a complete step by step program that guides you through every workout with the same science applied to exercise selection as in this video, head to the link below and start training like an athlete with the ATHLEAN-X Training Systems.
For more videos on how to build bigger traps and the best traps workout for getting bigger shoulders, be sure to subscribe to our channel at the link below and turn on your notifications so you never miss a new video when it’s published.
You can experiment with different cadences and sequences to see what feels most effective to you. Some options are doing one arm at a time, holding one in contraction while I bring the other one around or both arms at the same time.
Some of you might wonder about a movement in which bring our arms out into a T at our sides. That would be a middle trap exercise but it involves a lot of rear deltoid as well, which we’re not trying to target.
If we hold out our arms in a T, it does hit the middle traps but also engages the rear delt, which is not what we’re trying to target.
Instead, we want to keep the movement short and wrapped in tight to our body so we get more of that scapular retraction driven by the middle trap.
When you bend your elbows and hold them tight to the body, it helps retract the scapula to better target the middle trap.
Whether you’re going to be doing classic shrugs for the upper traps or are hitting the traps when doing your compound movements, incorporate an equal number of sets of this exercise to make sure you’re hitting the middle traps.
HOW TO HIT THE LOWER TRAPS
The lower traps are incredibly important for the proper motion of the shoulder as you raise it up over your head.
If you don’t focus on specifically trying to target the lower traps, you are likely to have weak or undeveloped muscles in this area. The Prone Dumbbell Press is a great exercise option for targeting the lower trapezius.
The key here is not to focus on the amount of weight that you’re lifting, but instead focus on the quality of each contraction. These lower trap fibers are usually very underdeveloped and need your maximum mind muscle connection in order to flourish.
The Prone Dumbbell Press is a great exercise for hitting the lower traps.
You don’t need to use a lot of weight to do this exercise. As a matter of fact, some people will find that just doing the motion alone is all they need to overload this area because it’s a chronically weak portion of the traps.
Now, I’m going to show you a really easy way to incorporate this movement into your workouts. If you’ve been watching my YouTube channel for any length of time, you already know how much I value the face pull, and you should be doing face pulls after every, single workout!
Face pulls are one of my favorite exercises. So much so that I recommend doing them after every workout!
If you’re already doing your face pulls there’s a slight modification you can make to get this exercise to hit the middle trap and lower trap even more effectively. The Face Pull Press is a fantastic way to train your traps without having to add in additional sets of separate exercises.
Perform the face pull as you normally would and then add the additional overhead press to engage the lower traps. The act of pulling back on the cable or band alone is enough to fire up the middle and upper traps into the exercise.
The Face Pull Press is a great way to engage upper, middle and lower traps.
Pull back using the same proper mechanics as you would for a face pull. Lead with the hands and not with the elbows to avoid internal rotation of the shoulder. You want to create external rotation and get the shoulder working together with the rotator cuff and the mid-scapular muscles as they prefer to do.
Lead with the hands to create external rotation of the shoulder so that it can work together with the rotator cuff and the mid-scapular muscles.
From there, we raise our arms up over our head into the press portion of this movement. The force is pulling our arms out in front of your body so you have to work hard to keep the scapula retracted. You are combining that retraction with elevation and going through the entire range of motion.
Hopefully now you have a better understanding and appreciation of the traps. From now on you’ll be drawing that whole picture of the kite in your mind, and working the upper middle and lower traps in your training!
THE HIGHLIGHT REEL:
HOW TO GET BIGGER TRAPS
Most people only do shrugs when they train their traps. This is because they think the upper traps are the entire trapezius muscle, but actually they’re neglecting an entire two-thirds of this muscle!
I don’t typically include upper trap exercises in my training programs because the upper traps are engaged and incorporated into our foundational compound movements like rows, deadlifts and farmer’s carry. In fact, doing additional upper trap specific movements could put you at risk for overtraining the upper traps, which can cause muscle imbalances and postural problems.
Whether you perform those compound movements or do shrugs for your traps, you are still neglecting the middle and lower portion of this muscle.
You can target the middle trap with the Wraparound Press and the lower trap with the Prone Dumbbell Press.
If you’re already doing Face Pulls after every workout (as you should be) you can modify them into a Face Pull Press to hit upper, middle and lower traps with just one exercise!
I say it all the time… “All muscles matter!” If you’re looking for a complete step by step program that doesn’t overlook any muscle and that applies science to every exercise selection, check out our complete selection of programs at ATHLEANX.com.
You’re a busy man. So when you work out, you aim to get in both strength training and cardio exercise in a single session.
But should you do weights or cardio first?
To help me answer that question, I talked to my barbell coach, Matt Reynolds, owner of Barbell Logic Online Coaching.
His answer? For most people, it’s best to lift weights before doing cardio.
For why, read on.
Why You Should Lift Weights Before Doing Cardio
To get stronger, you want to lift the most weight possible during a workout. But when you do cardio before you lift weights, you prevent yourself from achieving this goal. As Matt explains, “When you do cardio before strength training, you fatigue the muscle, which causes a decrease in the contractual force your muscles are able to produce, which means you can’t lift as much.”
He continues:
This is because of the ‘all or none principle’ of muscle contraction. Muscle fibers contract at 100%, or they don’t contract at all.
So to lift something 70% of your max would require 70% of your muscle fibers to fire at 100%, rather than 100% of your muscle fibers to fire at 70%.
Because of this, if SOME of your muscle fibers are already fatigued from previous cardio, then less muscle fibers are available to contract for weight training.
Research bears this out. In a study published in the Journal of Strength and Conditioning Research, researchers found that subjects who did a bout of treadmill running before lifting weights had a decrease in muscle power and performed fewer reps compared to when they lifted before running on the treadmill. What’s more, when subjects ran before lifting, lifting just “felt” heavier. The rate of perceived effort increased.
Prioritizing weight training over cardio exercise will not only allow you to lift more lbs, but that advantage leads to another: enhanced fat loss. Matt unpacks how: “Increasing muscle mass increases your resting metabolic rate which allows you to burn more calories when you’re just sitting there existing. And if you want to increase muscle mass, you need to lift heavy weight, and lifting weights before cardio lets you lift heavier weight.”
A final added benefit for lifting weights before cardio is that it can simply save you time in the gym. “Cardio fatigues your muscles so when you finally get to lifting, you may find yourself having to take longer rests between sets to complete your reps, which may lengthen the duration of your workout,” Matt explained.
So if you’re looking to get stronger, lose body fat, and save time in the gym, lift weights before doing cardio.
But isn’t the inverse of this equation also true — that doing strength training before cardio will fatigue your body, diminishing the intensity of your cardio?
Yes, but Matt says it’s important to remember why most people do cardio: “The goal of cardio is to increase aerobic health and improve metabolic pathway conditioning. You can still get your heart pumping and your lungs sucking air even when your muscles are fatigued from weight lifting.”
As he succinctly sums it up: “Weight training doesn’t hurt cardio as much as cardio hurts weight training.”
The Exception to the Rule: If You’re Training for an Endurance Event, Do Cardio First or on Different Days Than You Lift
While Matt recommends most people lift weights before cardio, he does recommend that endurance athletes reverse that order and do cardio before lifting weights. “If you’re training for a 5K, a marathon, a mud run, etc. your primary objective is to increase performance in that event, so you want to go as hard as you can when you train. Lifting weights before endurance training will prevent you from doing that,” he explained.
Matt recommends that endurance athletes do their endurance training and weight training on different days to ensure adequate recovery between training sessions. I’ve known a number of amateur runners who have had great success, both in terms of enhancing performance and preventing injuries, in alternating strength training workouts and running workouts every other day. If that’s not possible due to time constraints, or because your running program requires you to run every day, lift weights AFTER you do your endurance training.


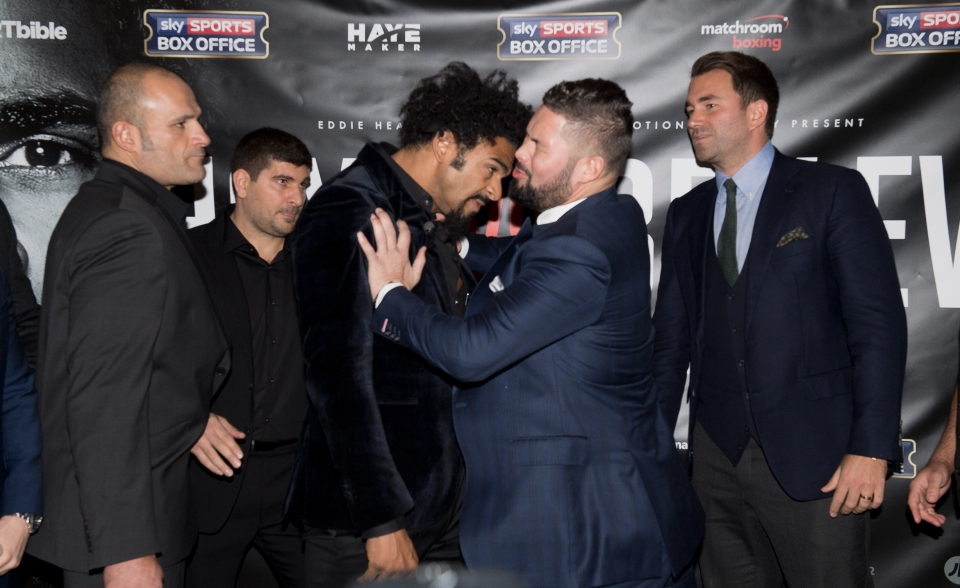
 Haye and Bellew had to be separated by security after a punch was thrown


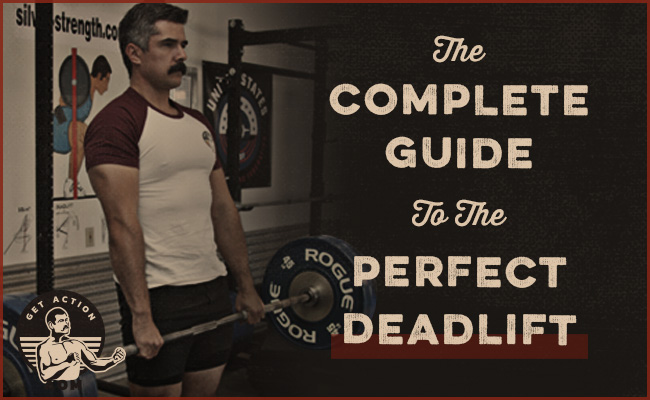
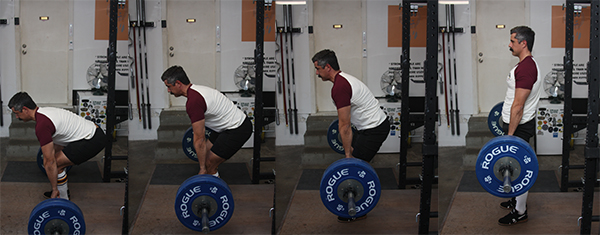
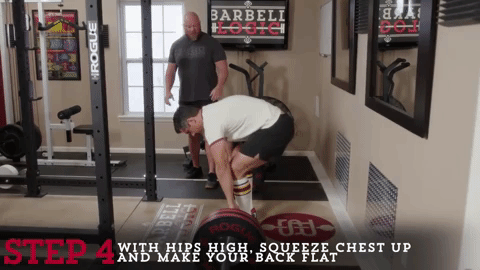

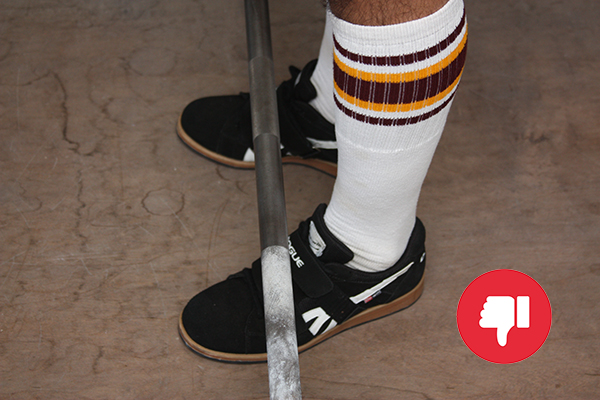
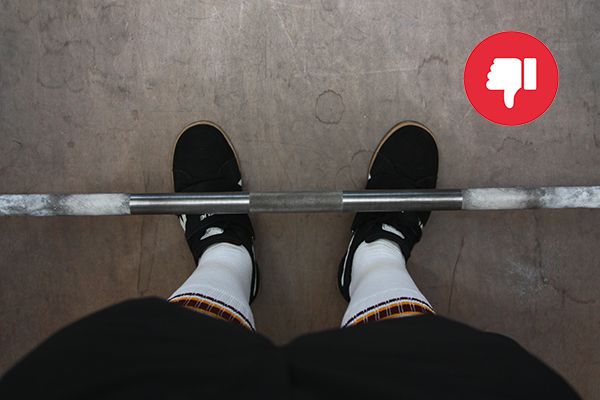
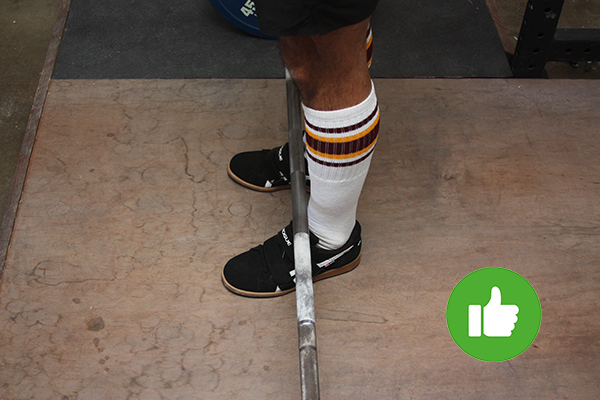
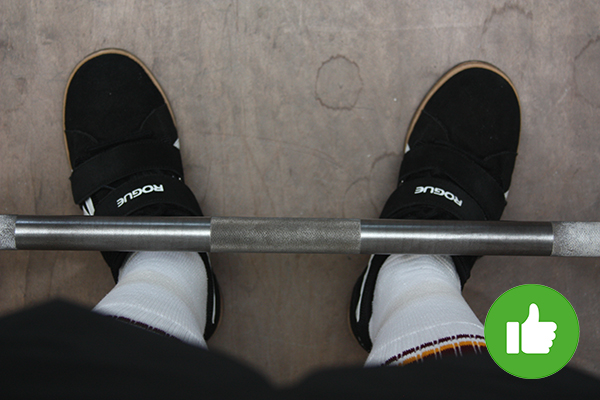
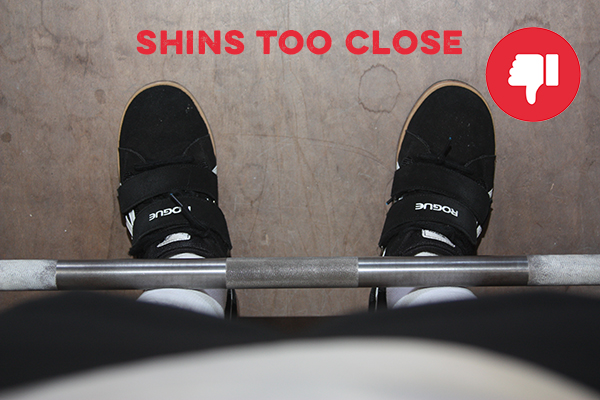
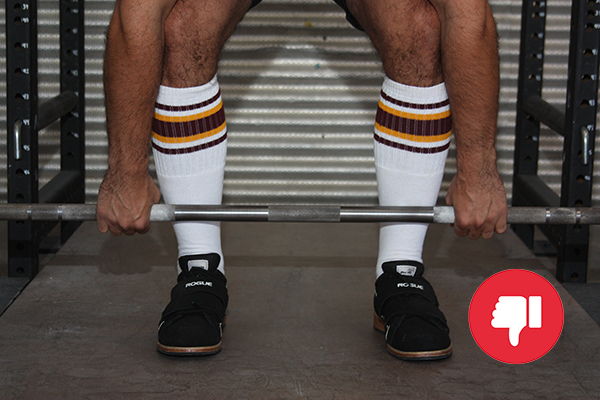
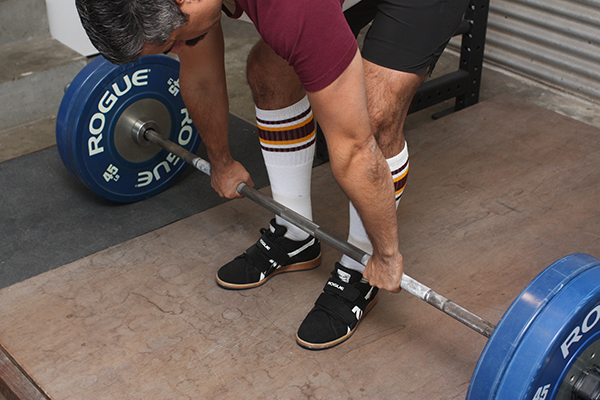
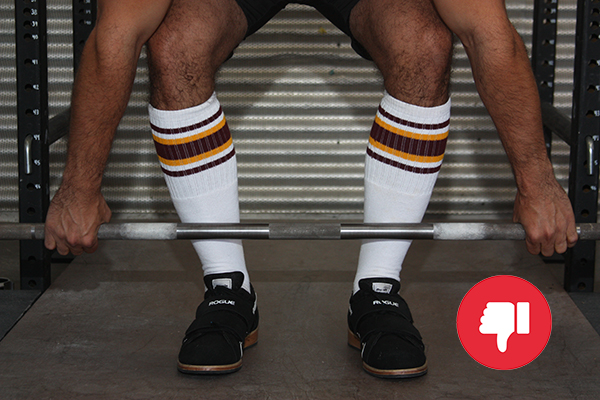
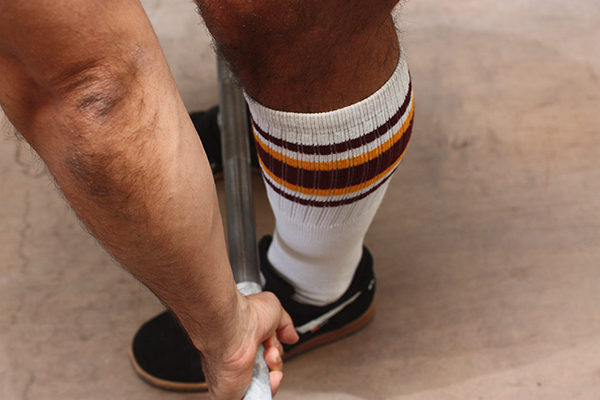
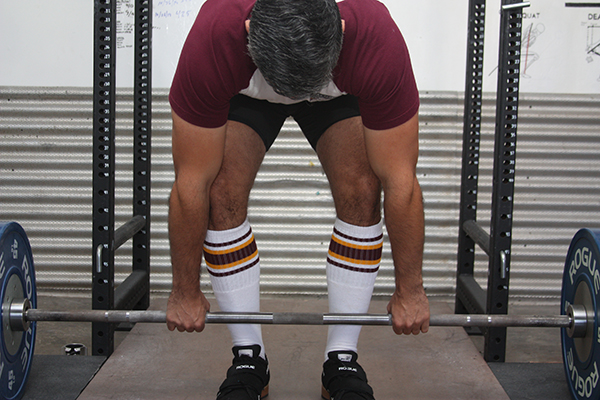
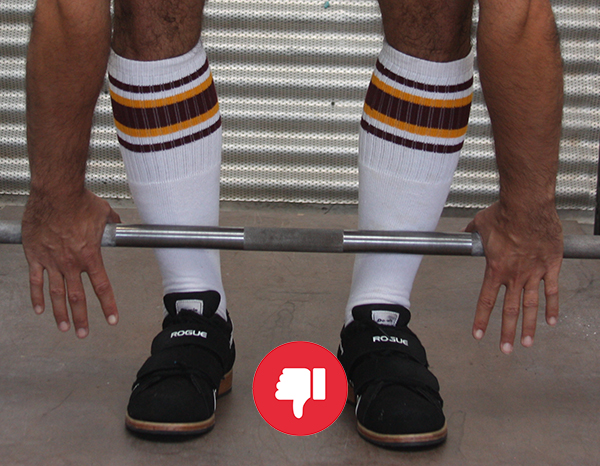
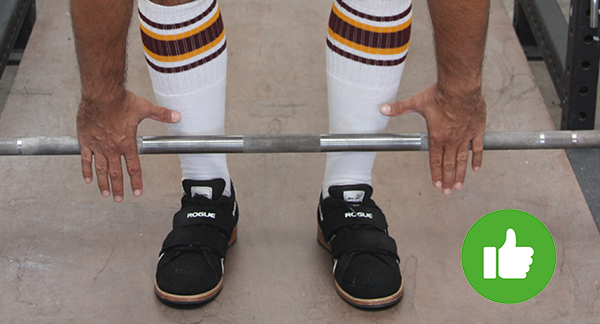
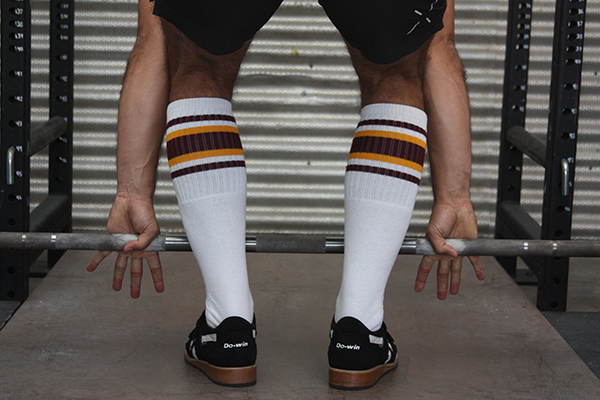

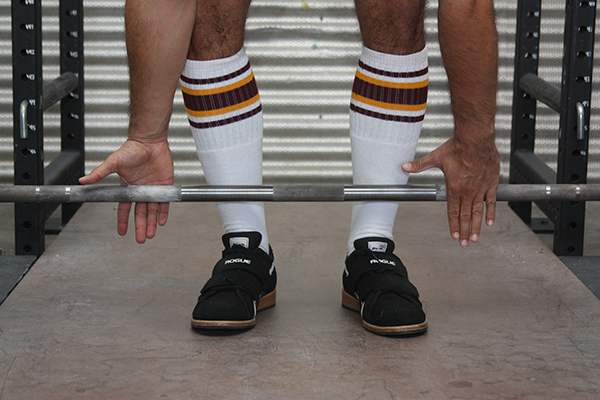
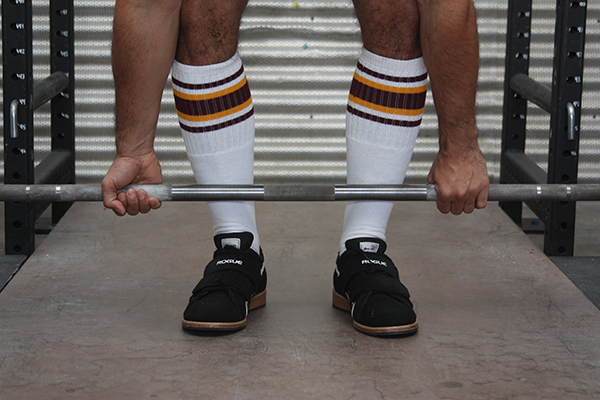
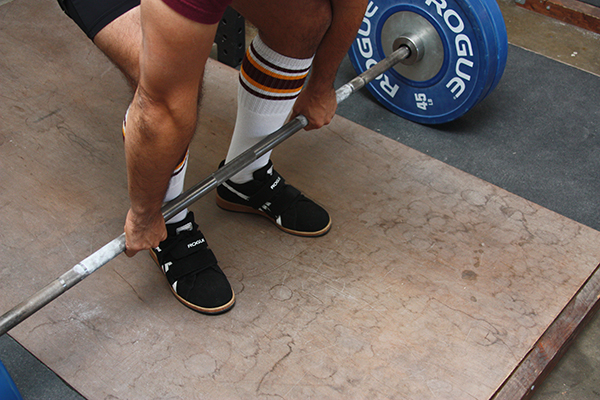
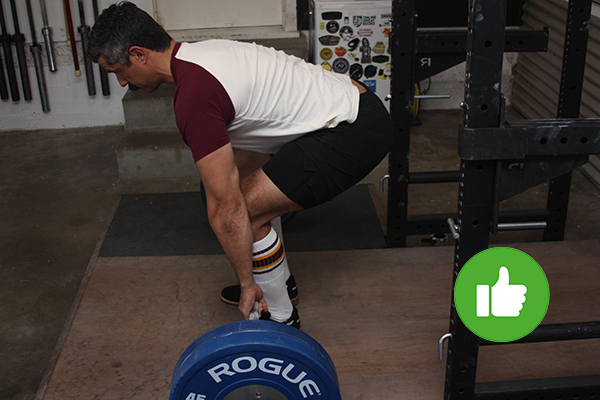
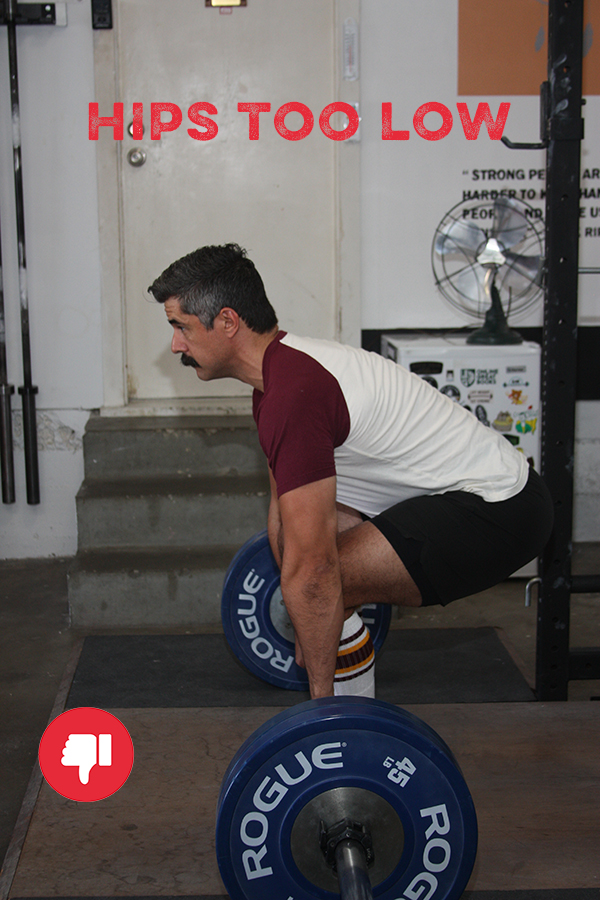
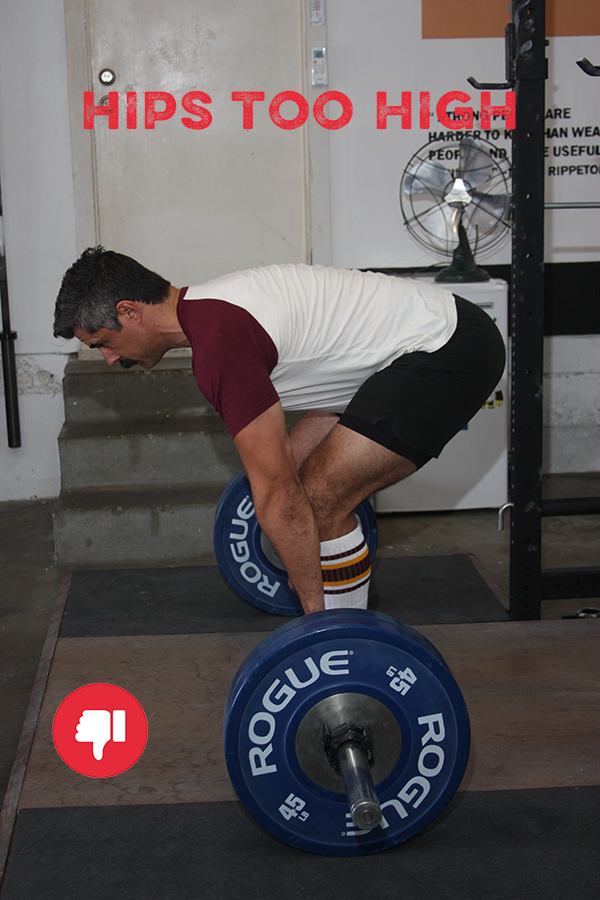
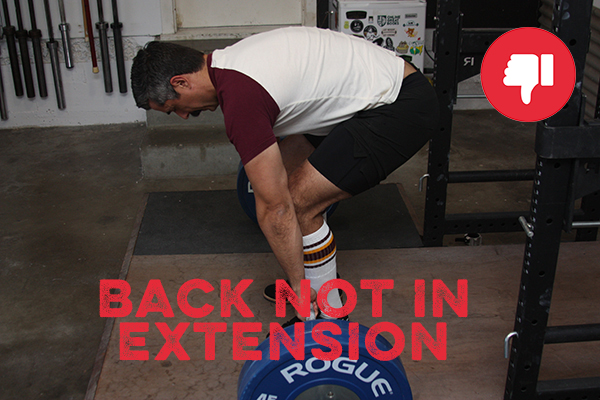
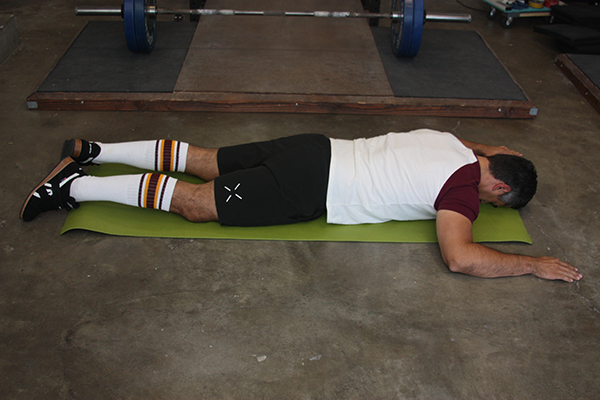
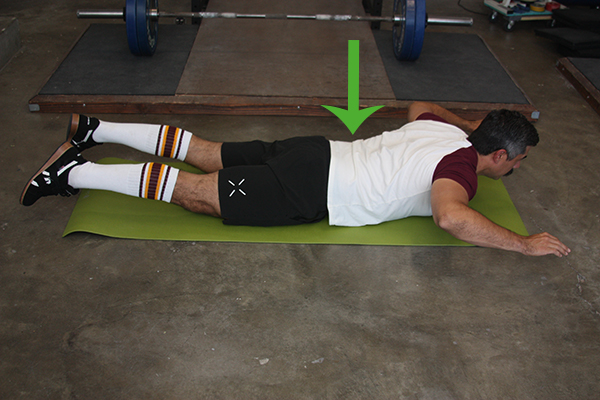
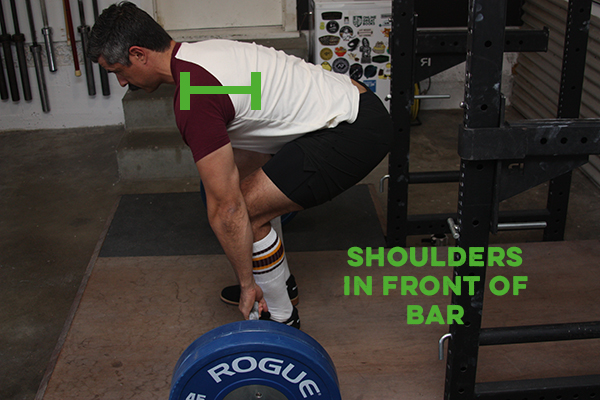
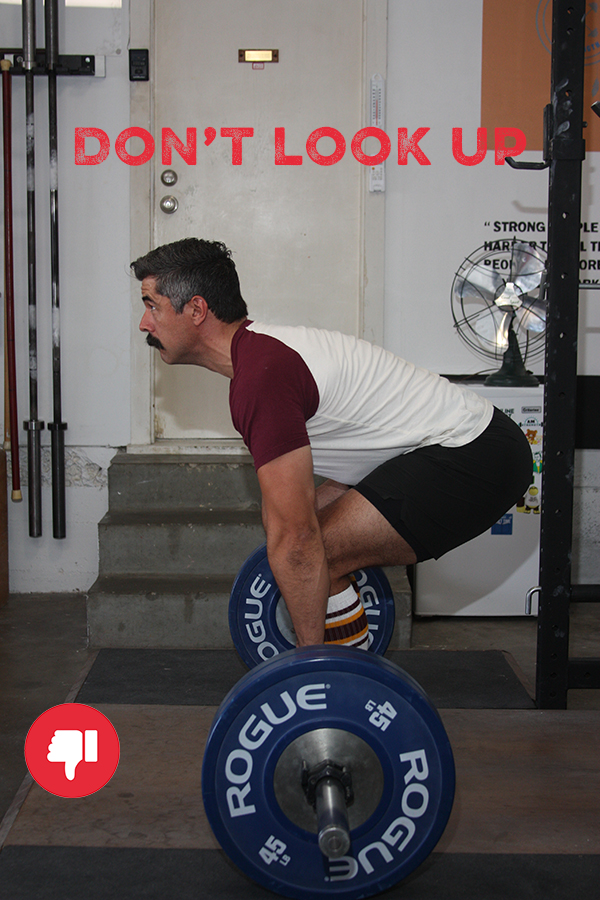
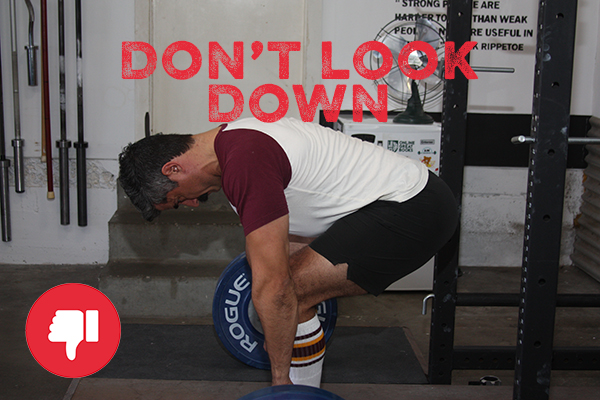
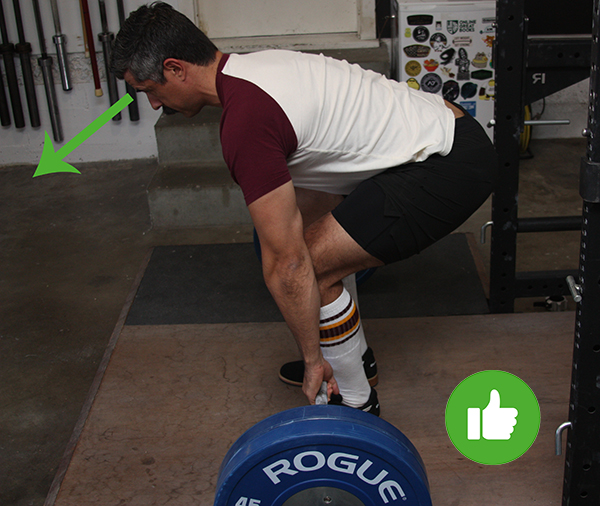
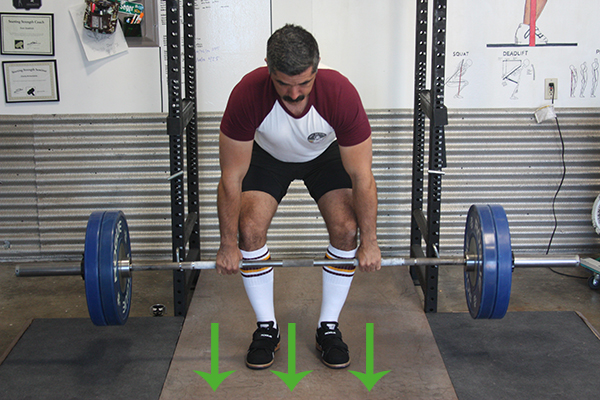
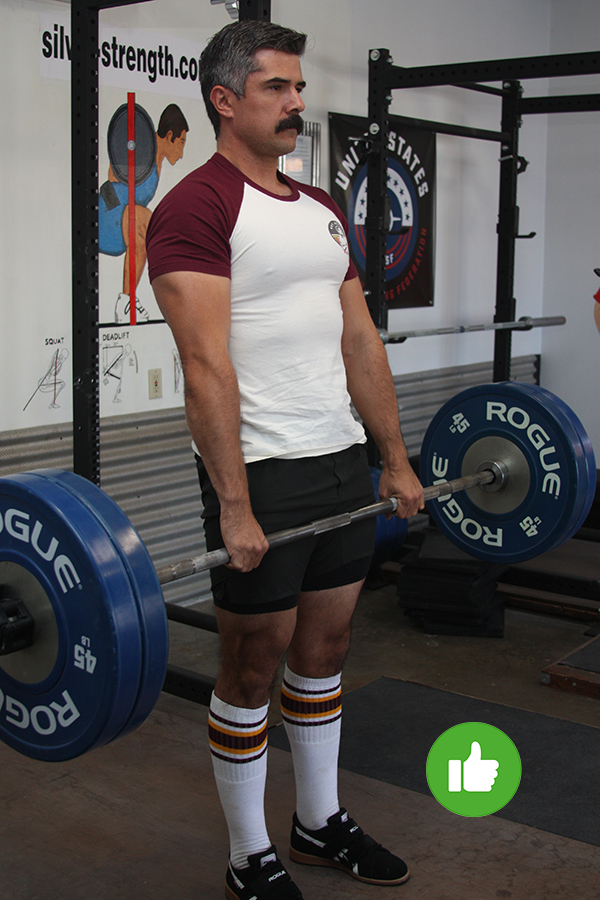
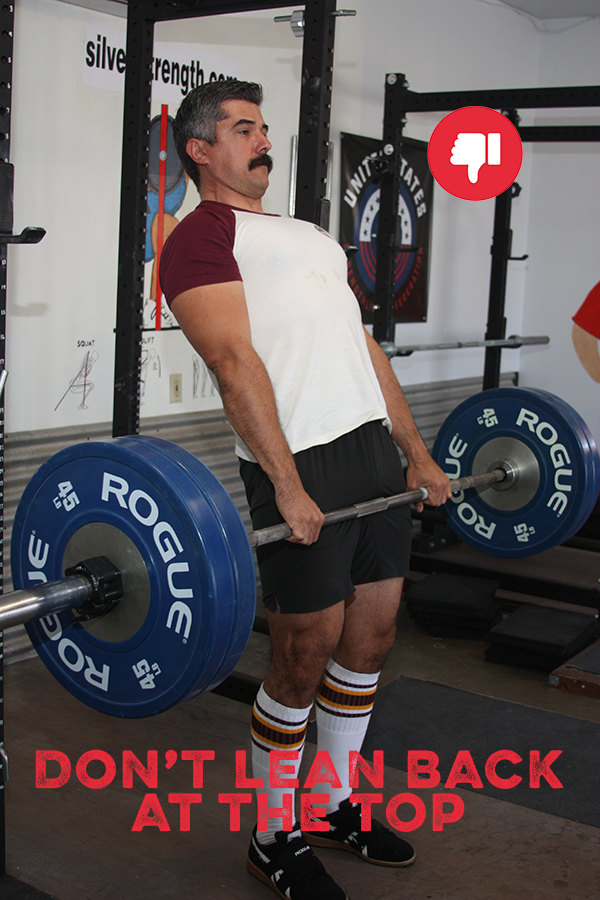
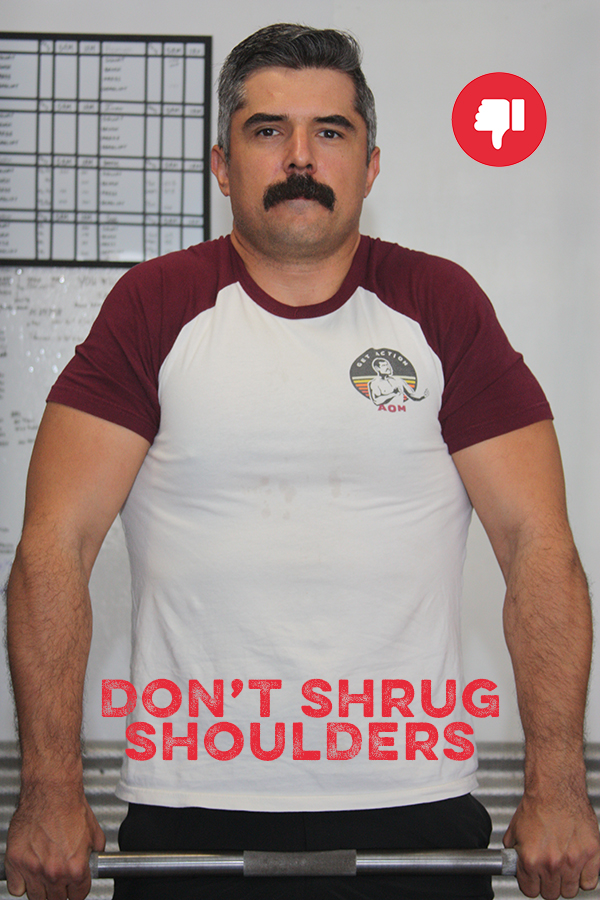
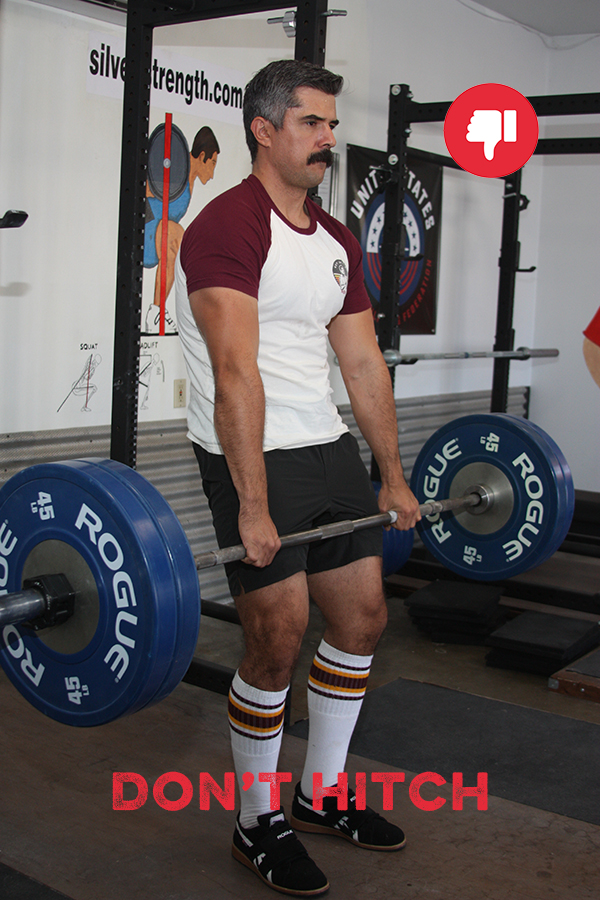
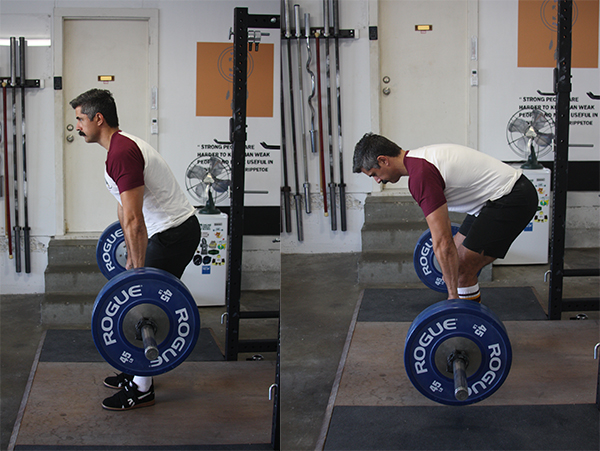
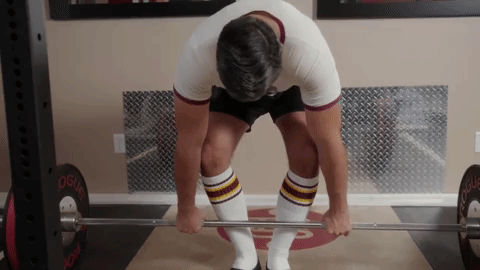
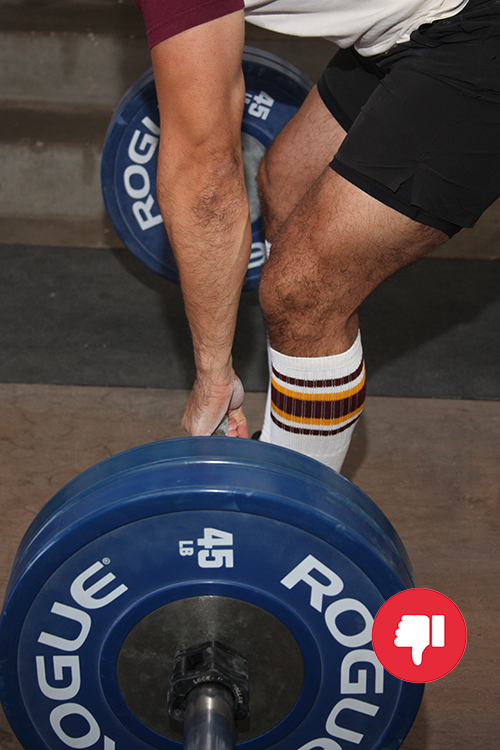
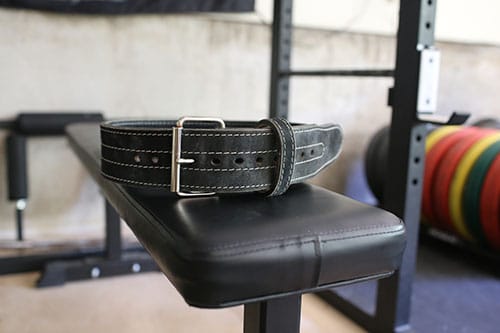
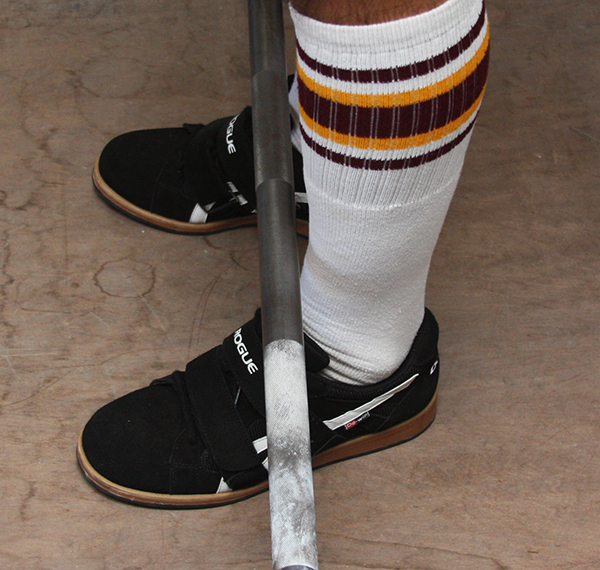
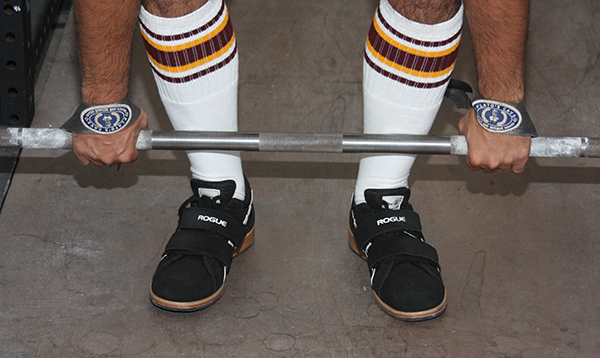
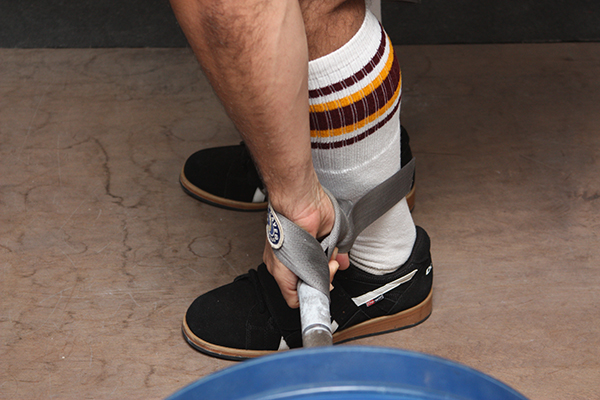
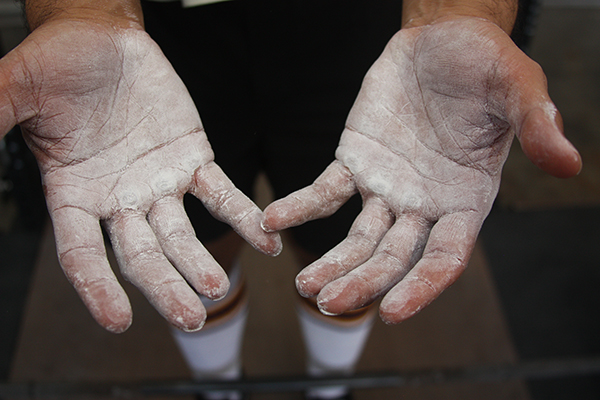
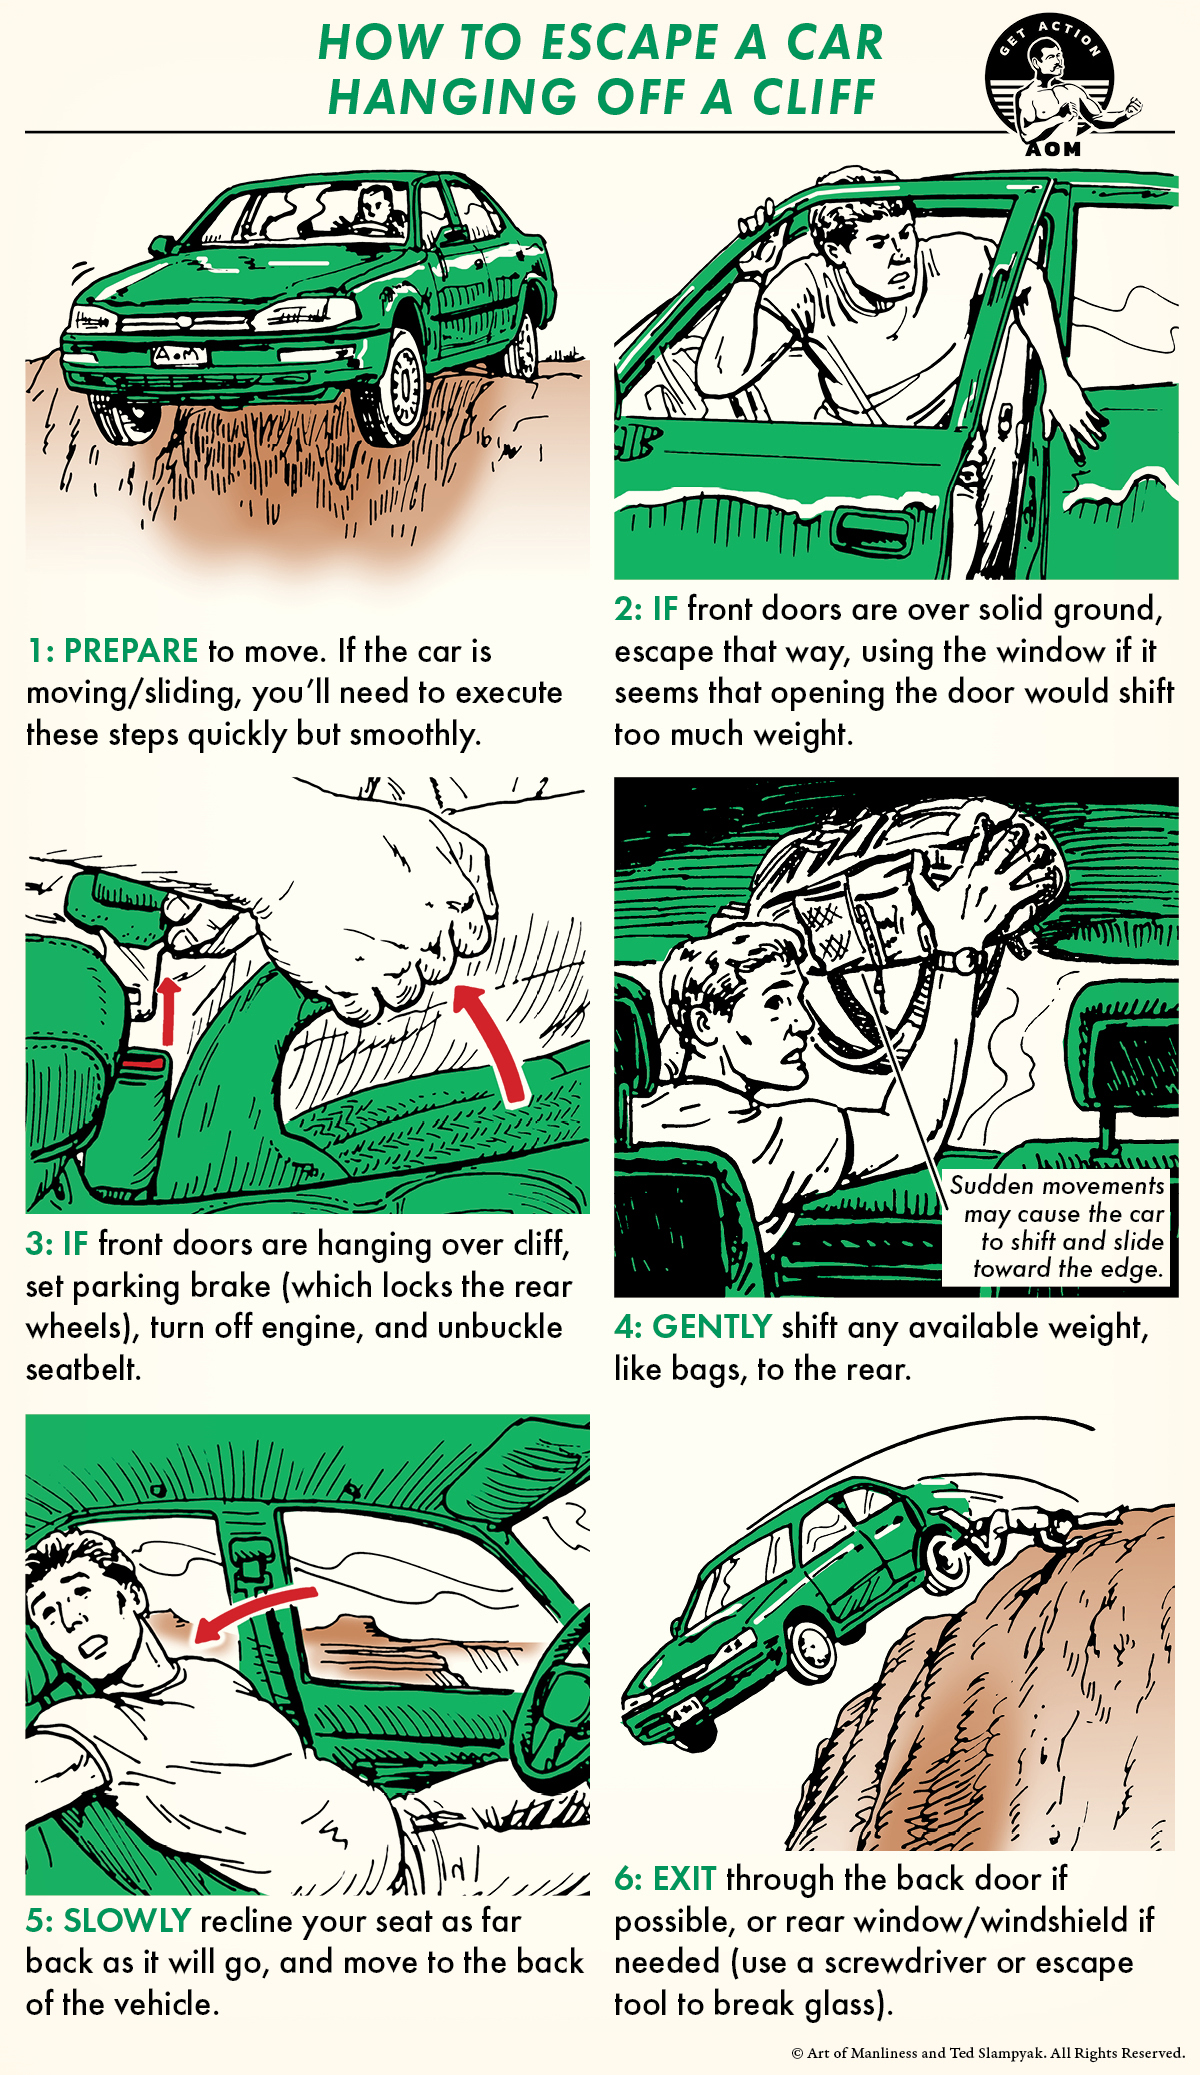
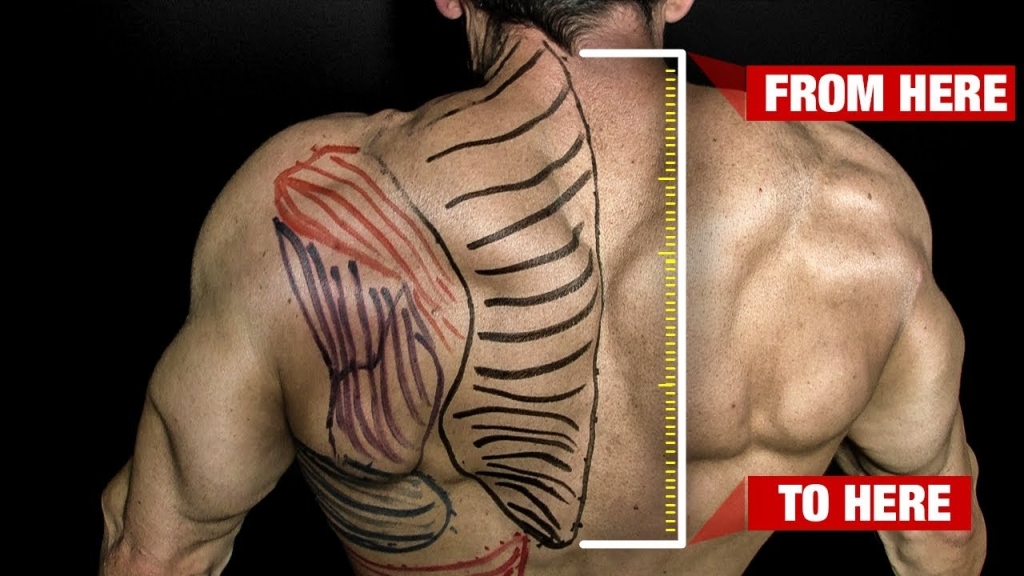
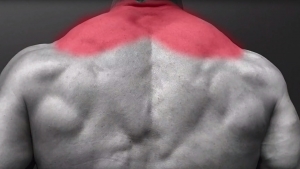
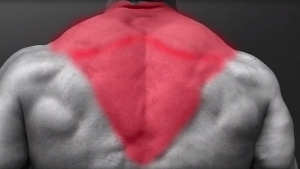
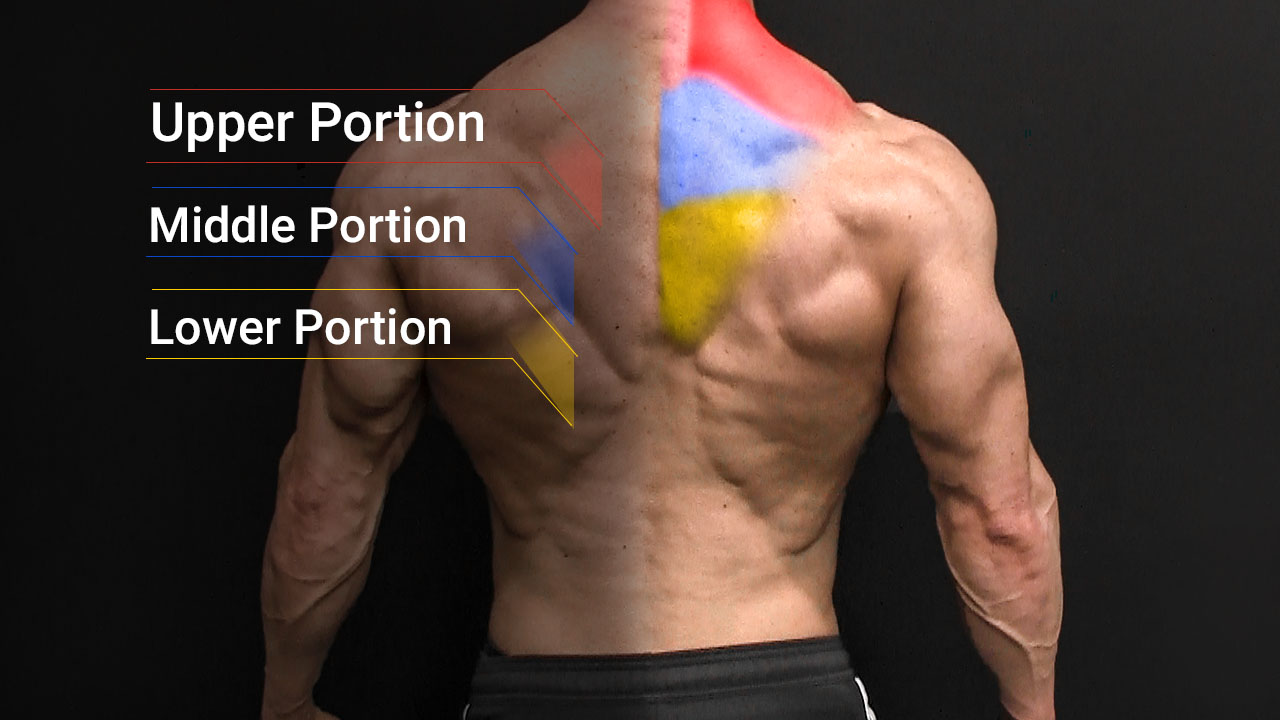

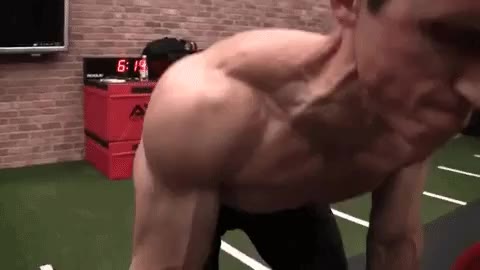

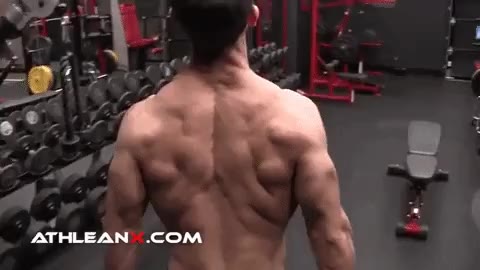

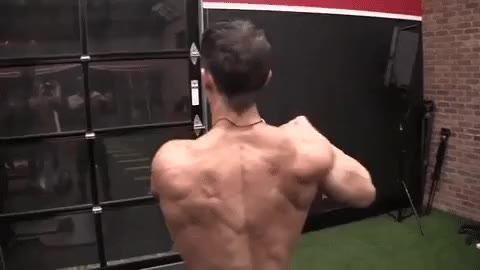
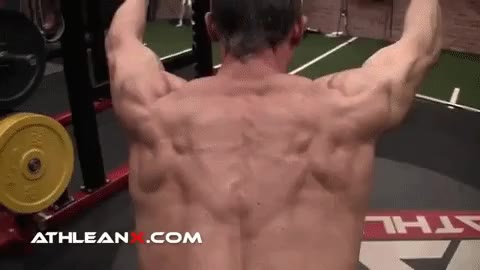
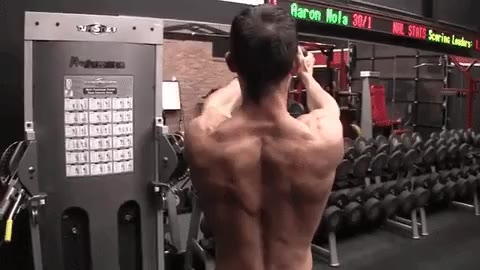
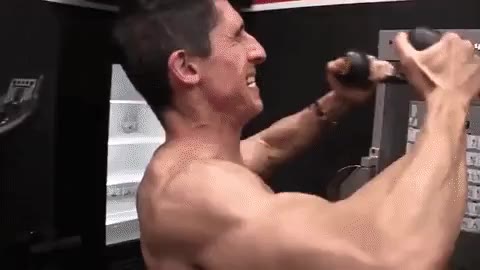
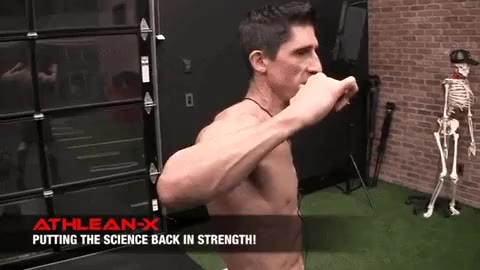

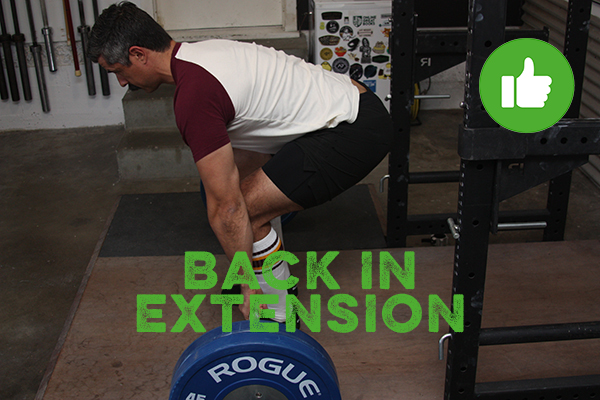